Guide to Collecting Hellebore Seeds for Plant Propagation
If you’re a dedicated gardener with a passion for hellebores, unlocking the secret of propagating these wondrous plants from seeds can be both thrilling and profoundly satisfying. Hellebores, also known as Lenten roses, are renowned for their early-blooming flowers, rich in color and variety. Growing them from collected seeds is a surefire way to expand your garden’s palette and add a touch of elegance to any landscape. In this comprehensive guide, we will take you through each step, from harvesting the seeds to nurturing the next generation of hellebores.
Understanding Hellebore Seeds
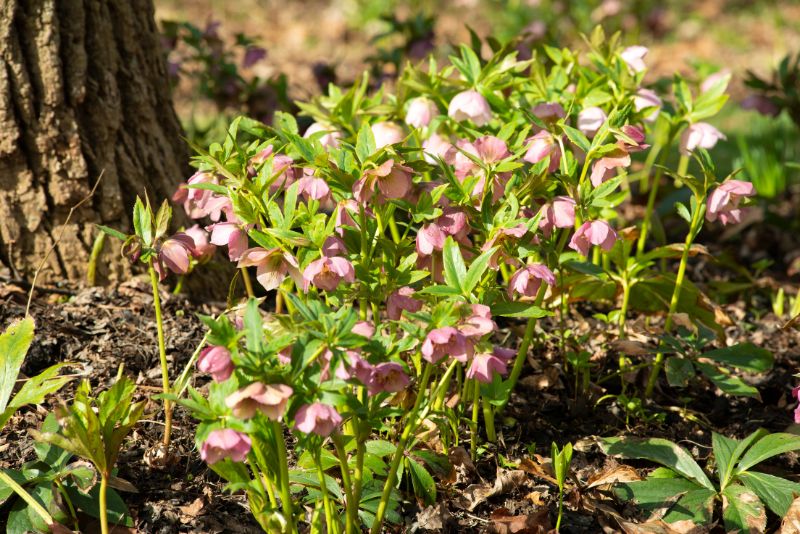
Before you venture into the world of seed collection, it’s vital to know your subject. Hellebore seeds, like the plants they come from, are hardy and resilient. They are tiny, dark in color, and have a distinctive wrinkled texture that aids in their germination. One of the reasons hellebore seeds are so ideal for propagation is that they can be stored for an extended period without degrading, allowing for flexibility in when and how they are planted.
When it comes to propagating hellebores, seeds offer the most diversity. While division and tissue culture produce genetic clones of the parent plant, growing from seeds means the chance for crosses with other hellebores in your garden, yielding graceful variations that can only be achieved through natural pollination.
When to Collect Hellebore Seeds
Knowing when to collect hellebore seeds is crucial. Timing is everything, and if you wait too long, the seeds may be dispersed naturally, or worse, the pods may split, and the seeds will be lost.
The best time is in mid-summer, once the seed pods have turned from green to brown and become papery in texture. You can tell they are ready when they have developed a slight give when pressed, indicating the seeds inside are firm and fully formed.
Methods of Collecting Hellebore Seeds
To collect the seeds, you’ll need to start with the right tools: sharp scissors or pruners, a paper bag, and a tray or spread of newspaper to catch any stray seeds.
Begin by carefully snipping the seed pods from the plants, ensuring they are completely dry. If the pods are still green, they may need a bit more time, but be sure to check them regularly as you don’t want to miss the window when they’re at their peak readiness.
After cutting, gently shake the pods over the tray or newspaper to release the seeds. They’re quite small and may require a delicate hand to separate them from chaff or other plant matter.
Once you’ve gathered all the seeds, resist the temptation to keep them in plastic or airtight containers, as this can lead to moisture buildup. Instead, store them in paper or cloth bags, which allow for natural air circulation, keeping the seeds dry and viable for a longer period.
Plant Propagation from Hellebore Seeds
With your seeds collected and safely stored, the next step is to propagate new hellebores from them. This process requires patience, as hellebore seeds have a slow germination rate. However, the rewards are well worth the wait.
The general rule of thumb is that hellebore seeds do best when sown the same year they are collected, as freshness can impact their overall viability.
You can start by preparing a pot or a seed tray with a good-quality, well-draining soil mix. Lightly press the seeds into the soil, but do not cover them, as they require some light to germinate. Water the soil well, and place the container in a shaded area with indirect sunlight.
Keep the soil consistently moist but not waterlogged, and within several weeks to a few months, you should see the first tiny leaves of your new hellebores emerge. Once they develop a set of true leaves, they can be transplanted into their own pots or directly into the garden.
Tips and Best Practices
For the best chances of success, consider the following tips and best practices:
- Ensure that the soil is not too acidic, as this can inhibit germination. A slightly alkaline pH is ideal for hellebores.
- Try to sow the seeds as soon as possible after collection, as freshness can significantly increase the likelihood of successful germination.
- Label your seedlings so you know which type of hellebore they are. This is important for keeping track of potential hybrids and special characteristics you might want to cultivate.
- Be patient – hellebores can take up to a year to reach a stage where they can be planted outdoors safely.
- Protect seedlings from slugs and snails, which can view the tender new growth as a tasty treat.
Conclusion
The entire process of collecting hellebore seeds, nurturing them to germination, and watching the plants grow and bloom is a testament to the marvel of nature. Each step is an art that you, as a gardener, perform with care and patience.
By understanding the timing and techniques of seed collection and propagation, you open the door to endless possibilities for your garden. You contribute to the lineage of your hellebores and enjoy the unique satisfaction of knowing that each plant in your landscape has a story that you helped write.
Start your hellebore seed collection and propagation now, and before long, your garden will be filled with the beauty and grace of these timeless flowers, each one a testament to your dedication and the cycle of life that you’ve been a part of.