How to Plant, Grow, and Care For Chrysanthemums in Your Garden
Chrysanthemums, often referred to as “mums”, are a beautiful addition to any garden. These gorgeous flowers come in a variety of colors, sizes, and shapes making them a popular choice among gardeners. Not only are they visually appealing but they also have a long blooming season, making them a great investment for your garden. In this guide, we will take you through the steps of planting, growing and caring for chrysanthemums in your own garden. Whether you are a seasoned gardener or just starting out, this comprehensive guide has everything you need to know about these stunning flowers.
Chrysanthemums Overview
Here’s an overview table for Chrysanthemums:
| Plant Type: Perennial | Maturity Date: 80-120 days after planting | Attracts: Butterflies |
| Season: Fall | Maintenance: Moderate | Hardiness Zone: 5-9 |
| Pests: Aphids, spider mites | Species: Chrysanthemum morifolium | Plant with: Other fall-blooming perennials like asters and sedum |
| Slugs Family: N/A (Not applicable as slugs are not part of the plant’s family) | Growth Rate: Moderate | Planting Depth: Same depth as the container it came in |
| Exposure: Full Sun | Soil Type: Well-drained soil | Watering Requirement: Regularly, do not let soil dry out |
| Diseases: Powdery mildew, leaf spots | Native Area: Asia and northeastern Europe | Don’t plant with: Plants that require dry conditions |
| Genus: Chrysanthemum | Plant Spacing: 18-24 inches apart | Height: 1-3 feet |
Please note that some information like ‘Slugs Family’ is not applicable to the plant as slugs are pests, not a part of the plant’s taxonomy. The information provided is general and can vary depending on the specific variety of chrysanthemums and local growing conditions.
All About Chrysanthemums
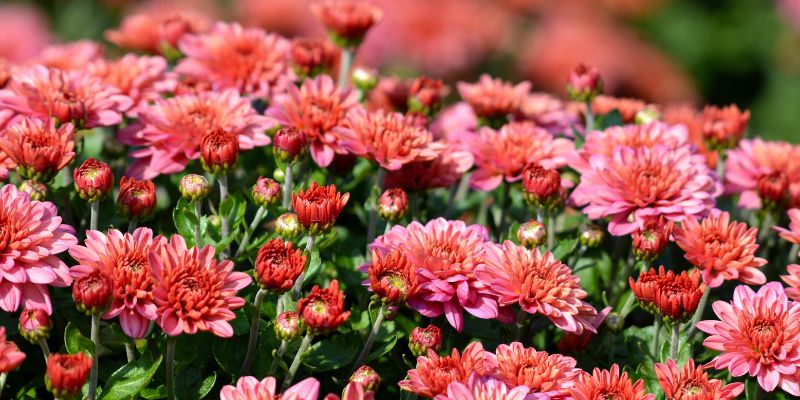
Chrysanthemums, the quintessential mark of autumn, trace their origins to Asia and northeastern Europe. The name “Chrysanthemum” is derived from the Greek words ‘chrysos’ meaning gold, and ‘anthemon’ meaning flower, which accurately describes their traditionally golden color. Over time, selective breeding has expanded the range of colors and forms, making them a diverse species that can complement any garden palette.
Botanical Characteristics
The botanical genus Chrysanthemum is a large one, encompassing numerous species that vary in size, form, and habitat. Typically, chrysanthemums feature a bushy form, with deeply lobed leaves and large flower heads that bloom in an array of colors from white, yellow, and pink to deep reds and purples. These perennials are photoperiodic, meaning they bloom in response to the shorter days and longer nights experienced in late summer to autumn.
Varieties and Selection
There are innumerable varieties of chrysanthemums, each with its unique charm. Some popular types include the anemone, cushion, pompon, spider, and single or quill flowered. Gardeners can select the perfect chrysanthemums by considering the flower’s form, color, bloom time, and hardiness to match their garden’s design and climate.
Planting and Location Preferences
When planting chrysanthemums, it’s essential to choose a location with ample sunlight, as these flowers thrive with six to eight hours of direct sunlight a day. They prefer well-draining soil with consistent moisture yet are surprisingly adaptable to a range of soil types if drainage is good. Ideal planting times vary by region but generally coincide with spring to ensure that roots are established before the onset of winter.
Growth Habits and Caring Tips
Chrysanthemums are not particularly fussy, but they do require some care to achieve their best bloom and healthiest growth. Regular watering, adequate spacing, and appropriate fertilization are key. To encourage a bushier growth and more blooms, gardeners can pinch back the stems and remove spent flowers, a process known as deadheading.
Understanding chrysanthemums’ complexity and diversity is the first step in cultivating these captivating flowers. With a bit of knowledge and care, they can be a brilliant highlight in the autumn garden, bringing joy and color to the landscape.
Chrysanthemums Varieties
Diving into the world of Chrysanthemums varieties is akin to exploring a living kaleidoscope. Each variety comes with its own slice of history, a distinct appearance, and subtle scents that add to the allure of these versatile blooms.
Ancestry and Development
Chrysanthemum varieties have evolved significantly from their wild ancestors through centuries of cultivation and breeding. Originating in Asia, these flowers have been part of cultural practices for more than a millennium, most notably in China and Japan, where they symbolize longevity and rejuvenation. Over time, these blooms made their way to Europe and America, where breeding programs expanded their diversity, leading to the hundreds of varieties we see today.
Visual Appeal and Aromas
Each Chrysanthemum brings a visual feast: the Anemone variety is known for its central cushion of dense petals surrounded by longer, daisy-like petals; the Cushion mums resemble a soft dome with their mass of perfectly arranged petals; Pompons are globular with tightly inwards-curving petals; the Spider variety stands out with tubular petals that arch outwards like spider legs; and the Single or Quill varieties exhibit a more simplistic, daisy-like structure. The color palette they offer is equally impressive, ranging from pure whites to vibrant yellows, rich reds, and deep purples. Despite chrysanthemums being more known for their visual splendor, they can also exude a subtle fragrance, especially when mass-planted, filling the autumn air with a gentle, sweet aroma.
Similarities Across Varieties
While varieties of chrysanthemums may differ in appearance, they share common characteristics. Most chrysanthemums don a cheerful demeanor with bright, showy blooms that cover the plant’s upper foliage in the flowering season. They also share the same growth requirements: an abundance of sunlight, well-drained soil, and moderate water. Additionally, all varieties are photoperiodic and respond by blooming as the days shorten, signaling the arrival of fall.
Understanding these varieties is crucial for gardeners who wish to select the right chrysanthemums that not only blend with their garden’s aesthetics but also fulfill their preference for certain floral characteristics like ease of growth, bloom duration, or scent. Through careful selection and cultivation, gardeners can celebrate the season with a riot of color and a nod to a rich floral heritage.
Chrysanthemums Care Procedures
Care Procedures for Chrysanthemums: Light and Temperature
Properly managing light exposure and temperature is critical for the successful cultivation of chrysanthemums. These plants flourish under full sunlight, requiring at least six hours of direct sun per day to achieve optimal growth and bloom. This exposure is vital for photosynthesis, the process by which plants produce the energy they need to grow and develop healthy flowers. Too little light can lead to leggy plants with weak stems and sparse blooms.
When it comes to temperature, chrysanthemums are fairly hardy, but they do best in moderate to cool climates, with ideal daytime temperatures ranging between 60°F to 75°F (15°C to 24°C). During the flowering period, cooler temperatures can actually enhance and prolong the vibrancy of their blooms. While most varieties can tolerate a light frost, it’s important to avoid exposure to freezing temperatures, which can damage the plant and blooms.
In regions with particularly hot summers, some afternoon shade may be beneficial to prevent the foliage from scorching. Conversely, in areas with less intense sun, positioning chrysanthemums in a spot that captures the maximum amount of light will be necessary.
For gardeners looking to force blooms for a particular season, controlling the photoperiod—the plants’ light and dark cycles—is an option. By artificially adjusting the times at which chrysanthemums are exposed to light and darkness, one can encourage flowering on a schedule. However, this usually requires specialized equipment and knowledge to execute correctly.
Understanding the interplay between light and temperature can help gardeners provide the best care for chrysanthemum plants, allowing them to thrive and bring their full color and beauty to the autumn garden.
Care Procedures for Chrysanthemums: Water and Humidity
Proper water management is essential for chrysanthemums to flourish. These plants prefer a consistent moisture level and do not fare well with either waterlogged soil or prolonged dry spells. It is generally recommended to provide chrysanthemums with about an inch of water per week, whether through rainfall or manual watering. Gardeners should aim to water the plants deeply and infrequently rather than shallow and frequent watering, as deep watering encourages the development of strong root systems.
In terms of humidity, chrysanthemums are relatively adaptable but thrive with moderate ambient moisture. Excessive humidity can encourage fungal diseases such as powdery mildew, especially if there’s poor air circulation around the plants. To mitigate this risk, ensure that chrysanthemums are spaced properly to promote air flow, and consider using a drip irrigation system or watering the base of the plants directly to keep the foliage dry.
During periods of high humidity or when the plants are densely packed, it’s wise to sprinkle them with a fungicidal spray as a preventative measure. Additionally, mulching around the base of the plants can help retain soil moisture and prevent water evaporation, especially during the hotter parts of the growing season. Select a mulch that also allows air to pass through, such as straw or shredded bark.
Gardeners should also be attentive to the specific watering needs of their chrysanthemum varieties. Container-grown chrysanthemums, for instance, may require more frequent watering than those planted in the ground due to quicker soil drying. On the other hand, during the fall and cooler months, less water may be necessary.
Monitoring soil moisture before each watering can help prevent over- or under-watering. A simple finger test—inserting a finger into the soil up to the second knuckle—if the soil feels dry at that depth, it’s time to water. Utilizing a water meter can also provide a more precise measurement.
By maintaining a regular watering schedule and monitoring humidity levels, gardeners can ensure that their chrysanthemum plants maintain optimal health and display a spectacular bloom when the season arrives.
Care Procedures for Chrysanthemums: Soil Type, pH, and Preparation
Chrysanthemums thrive in well-drained soil, as standing water can lead to root rot and other harmful conditions. Ideal soil types for these flowers are loamy or sandy soils, which allow for proper drainage while still being able to retain the necessary nutrients.
Soil pH
The pH level of the soil is another vital aspect of chrysanthemum care. These plants prefer a slightly acidic to neutral soil, with a pH range between 6.0 and 7.0. Before planting, it’s advisable to conduct a soil test with a pH meter or a soil testing kit, available at most garden centers. If the soil is too alkaline, amendments such as sulfur or peat moss can help lower the pH. For soil that is too acidic, liming materials like dolomitic lime can be added to raise the pH to desired levels.
Soil Preparation
To prepare the soil for planting chrysanthemums, start by removing any weeds, debris, and large stones. Then, till the soil to a depth of at least 8-12 inches to loosen it, which will promote better root growth. Enriching the soil with organic matter is highly beneficial; well-composted manure or compost can be mixed into the topsoil. This not only improves soil structure and drainage but also adds vital nutrients.
In cases where the native soil is predominantly clay and possesses poor drainage, create raised beds or incorporate generous amounts of organic matter to improve the soil’s structure. For plants in containers, a high-quality potting mix designed for container gardening is the best choice because it provides the right balance of drainage and nutrient retention.
Improving Soil Drainage
Good drainage is a must. If the soil still does not drain well after adding organic matter, consider creating a raised bed, or alternatively, dig in coarse sand or perlite to further improve porosity. The goal is to have water drain freely so that the roots do not sit in water.
In conclusion, understanding and managing the soil type, pH, and preparation for chrysanthemums are essential for the health and vibrancy of these plants. With the right soil conditions, these colorful flowers will be a standout feature in any autumn garden.
Care Procedures for Chrysanthemums: Fertilization
Fertilization is a critical component of chrysanthemum care, as it ensures that the plants have all the necessary nutrients for vigorous growth and radiant blossoms. When to fertilize, what type of fertilizer to use, and how to apply it properly are key considerations for cultivating a thriving display of chrysanthemums.
Fertilizer Requirements
Chrysanthemums are heavy feeders and benefit from a balanced fertilizer that promotes both root and shoot growth. A general-purpose fertilizer with a ratio like 10-10-10 (NPK: Nitrogen, Phosphorus, and Potassium) is typically suitable for these plants. Starting at the beginning of the growing season, you should fertilize chrysanthemums once per month.
- Nitrogen (N) is essential for healthy leaf and stem growth.
- Phosphorus (P) supports strong root development and affects the blooming capability of the plants.
- Potassium (K) enhances overall plant vigor and disease resistance.
Fertilization Schedule
At the onset of the growing season, usually in the early spring, apply a slow-release fertilizer to provide a steady supply of nutrients over several months. When the plants begin to form buds, you may switch to a fertilizer higher in phosphorus to encourage blooming. Stop fertilizing when the chrysanthemums start to flower, as additional feeding can negatively impact bloom quality and the hardening process before winter.
Application Methods
Apply granular fertilizer evenly around the base of each plant, being careful not to let it touch the leaves or stems to avoid burn. Water the plants thoroughly after each application to help distribute the nutrients into the soil. For a liquid fertilizer, dilute according to the package instructions and apply to the soil at the base of the plant.
Organic Options
For those who prefer organic gardening practices, well-aged compost, fish emulsion, or worm castings are excellent nutrient-rich options that can be applied in a similar manner to chemical fertilizers. However, be aware that these organic alternatives may need to be applied more frequently due to their slower nutrient release rates.
Monitoring and Adjustments
Regularly observe your chrysanthemums for signs of nutrient deficiencies, such as yellowing leaves (lack of nitrogen), poor root growth (lack of phosphorus), or weak stems and susceptibility to disease (lack of potassium). Adjust your fertilization practices accordingly to address these issues. Conversely, if the plants display signs of over-fertilization like salt buildup in the soil or excessively leafy growth with few blooms, reduce the frequency and amount of fertilizer applied.
By following these fertilizer care procedures for chrysanthemums, your plants will receive the right nutrients in proper amounts to support their spectacular seasonal display. Remember to always read and follow the instructions on your chosen fertilizer product, ensuring the best possible care for your chrysanthemum garden.
Care Procedures for Chrysanthemums: Repotting
Repotting chrysanthemums is an important aspect of their care, particularly for varieties grown in containers. This process can rejuvenate an established plant’s growth and enhance its flowering potential. Here is a step-by-step guide detailing the repotting process.
Assessing the Need for Repotting
- Check if your chrysanthemum is showing signs of being root-bound. Indications include roots growing through the drainage holes, slowed growth, or water running straight through the pot without being absorbed.
- Inspect the plant in early spring just as active growth resumes, which is the best time for repotting most chrysanthemums.
Selecting an Appropriate Container
- Choose a new pot that is one size larger than the current one to give the roots more room to grow. Ensure the new pot has adequate drainage holes to prevent water-logging.
- If the current pot is sufficiently large and the plant does not appear root-bound, you may simply refresh the soil instead of choosing a larger pot.
Preparation and Soil Mix
- Prepare a nutrient-rich potting mix suitable for chrysanthemums. It should be well-draining, with a pH level between 6.0 and 7.0. You can also add perlite or vermiculite to improve aeration and drainage.
- Sterilize the new container to prevent the spread of diseases. Rinse it with a solution of one part bleach to nine parts water, then rinse thoroughly with plain water.
Repotting Process
- Water your chrysanthemum thoroughly a few hours before repotting to reduce transplant shock.
- Gently remove the plant from its current pot, taking care not to damage the root system.
- Inspect the roots, trimming away any that are dead or excessively long, as this encourages new root growth.
- Add a layer of the prepared potting mix to the bottom of the new pot.
- Place the chrysanthemum in the center of the new pot. Ensure the top of the root ball is at the same level as it was previously. This prevents stem rot that can occur if the main stem is buried too deeply.
- Fill in around the roots with the potting mix, firming gently to secure the plant and eliminate air pockets.
- Water the repotted chrysanthemum deeply, allowing water to flow from the drainage holes. This settles the soil and ensures good contact between roots and the fresh potting mix.
Post-Repotting Care
- Position the repotted chrysanthemum in a location where it will receive adequate light and air circulation.
- Avoid fertilizing immediately after repotting to prevent burning the newly disturbed roots. You can resume fertilization after a few weeks once the plant has re-established itself.
- Monitor your chrysanthemum for signs of transplant shock, such as wilting or dropping leaves. Provide extra care and adjustments as needed during this period.
By carefully following these steps, you give your chrysanthemums the best chance for continued health and vigorous blooming after repotting. Remember, regular assessment and proper repotting techniques are essential components in maintaining a thriving chrysanthemum display.
Care Procedures for Chrysanthemums: Propagation
Propagating chrysanthemums ensures a continual display of these vibrant flowers in your garden. While division, as mentioned in the repotting segment, is a common method, you can also propagate chrysanthemums from cuttings or seeds. Here is a detailed guide on each propagation method.
Propagation by Cuttings
- Timing: The best time to take cuttings is in the spring when the new growth is about 3-6 inches long.
- Preparation: Choose healthy stems with no sign of disease or stress. Using a sharp, sterilized pair of scissors or a knife, cut just below a leaf node.
- Rooting: Remove the leaves from the bottom half of the cutting and dip the cut end into a rooting hormone. This will encourage root development.
- Planting: Place the cutting into a small pot filled with a mixture of peat and perlite or a well-draining potting mix. Water well and cover with a plastic bag or place in a propagator to maintain high humidity.
- Care: Keep the cuttings in a warm, bright place but out of direct sunlight until roots develop, which usually takes 2-3 weeks. Once rooted, transplant the chrysanthemum cuttings into larger pots or directly into the garden.
Propagation by Seeds
- Timing: Sow chrysanthemum seeds in late winter or early spring. They need a temperature of about 70-75°F (21-24°C) to germinate.
- Sowing: Use shallow trays or pots filled with seed starting mix. Sprinkle the seeds lightly over the surface, then cover with a thin layer of soil or vermiculite since they need darkness to germinate.
- Germination: Keep the soil moist but not saturated. Germination typically occurs within one to three weeks.
- Care: Once seedlings emerge, provide plenty of light to prevent them from becoming leggy. Transplant seedlings to individual pots once they are large enough to handle.
- Hardening off: Prior to planting outdoors, acclimate the young plants to outside conditions by gradually exposing them to outdoor temperatures for a week or two.
By utilizing these propagation techniques, you can expand your collection of chrysanthemums and enjoy their beauty in various locations throughout your garden. Whether by division, cuttings, or seeds, propagation is a rewarding and cost-effective way to increase your chrysanthemum displays.
Care Procedures for Chrysanthemums: Pruning
Pruning is a crucial aspect of caring for chrysanthemums to encourage bushiness, larger flowers, and a more robust display. It’s important to know when and how to prune to maximize the health and aesthetic of your chrysanthemum plants. Below is a detailed guide on the process.
Timing of Pruning
- Start pruning your chrysanthemums in the spring as the new shoots are about 4 to 6 inches long.
- Continue pinching back the tips as the shoots grow. The last pinch should be done by early summer, often around late June to early July depending on your climate, to allow flower buds to form.
Method of Pruning
- Pinching: Use your thumb and forefinger to remove the terminal portion of the stems to encourage branching. This can also be done with sharp scissors or pruners if you prefer.
- Disbudding: For larger, showier blooms, especially with exhibition types, remove the side buds and leave only the central, terminal bud to develop.
- Cutting Back: After flowering, cut the stems back to about 6 to 8 inches above the ground. This will help conserve the plant’s energy and maintain shape for the next growing season.
Pruning Practices
- When pinching back stems, always remove the tips just above a set of leaves to encourage multiple shoots to form from the leaf nodes.
- As the plant grows, repeat the pinching process every few weeks until the cutoff date in early summer. This will result in a fuller plant with more blooms.
- For tall or leggy plants, consider cutting back harder to about one-third of their height in the first pruning session.
- Never prune or pinch after the cutoff date, as this can delay flowering or prevent the chrysanthemums from blooming at all.
Post-Pruning Care
- After pruning, ensure that your chrysanthemums are well-watered as they recover and continue growing.
- If you performed a hard cutback, provide a balanced fertilizer to aid in recovery and promote healthy new growth.
Through diligent pruning practices, you will encourage your chrysanthemums to grow compactly with an abundance of blooms that are larger and more vibrant, enhancing the overall display of your garden. Pruning not only shapes the plant but also enhances its overall health, helping it to resist pests and diseases.
Troubleshooting
While chrysanthemums are generally hardy and reliable bloomers, gardeners may occasionally encounter issues affecting their health and vibrancy. Being able to identify and address common problems is key to ensuring the longevity and beauty of these plants. Below, we explore typical growing problems, pest infestations, and diseases that may plague chrysanthemums, along with practical solutions for each situation.
Growing Problems
- Stunted Growth or Poor Blooming: Inadequate sunlight, overwatering, or nutrient-depleted soil can lead to stunted chrysanthemum plants with subpar blooms. To remedy this, ensure that your mums receive at least 6 hours of sunlight daily, adjust watering to when the top inch of soil is dry, and apply a balanced fertilizer as recommended during the growing season.
- Legginess: Chrysanthemums may become leggy if they are not pruned regularly or if they’re grown in too much shade. Regular pinching as detailed in the pruning section can prevent this problem.
Pests
- Aphids: These small, pear-shaped insects congregate on the undersides of leaves and stems, sucking plant sap and weakening the plant. Rinse them off with a strong stream of hose water or treat the plants with insecticidal soap or neem oil.
- Spider Mites: Indicated by fine webs and stippled leaves, they are minute pests that thrive in dry conditions. Increasing humidity around the plants can help, and applications of miticides or horticultural oils can control infestations.
- Leaf Miners: Their larvae tunnel into leaves, causing irregular lines or blotches. Infected leaves should be removed and destroyed to curb their spread. Systemic insecticides can also be used as a preventive measure.
Diseases
- Powdery Mildew: This fungal disease presents as white or gray powdery spots on leaves and stems. Improve air circulation, avoid overhead watering, and apply fungicides as necessary to control the spread.
- Botrytis Blight (Gray Mold): This fungus causes gray, fuzzy mold on leaves, stems, and flowers, particularly in wet, cool conditions. Remove affected parts promptly, ensure good air flow, and apply suitable fungicides to prevent further infection.
- Rust: Rust appears as orangish, raised pustules on the undersides of leaves. To control rust, remove infected leaves, avoid wetting foliage, especially in the evening, and use rust-specific fungicides.
By staying vigilant and implementing these solutions, gardeners can successfully address the challenges of chrysanthemum cultivation, ensuring these cherished flowers thrive in the landscape.
Frequently Asked Questions
How often should I water my chrysanthemums?
Chrysanthemums should be watered regularly, ensuring the soil is moist but not soggy. Check the top inch of the soil; if it’s dry, it’s time to water. During hot, dry periods, more frequent watering may be necessary.
Can I grow chrysanthemums in pots?
Yes, chrysanthemums can thrive in pots. Choose a container with adequate drainage holes and use a well-draining potting mix. Potted mums may require more frequent watering than those planted in the ground.
When is the best time to plant chrysanthemums?
The optimal time for planting chrysanthemums is after the danger of frost has passed in the spring, although they can be planted anytime throughout the growing season till about two months before the first expected frost.
Do chrysanthemums come back every year?
Some chrysanthemum varieties are perennials and can come back year after year if planted in the ground and properly winterized. However, the florist-type mums often sold in the fall are typically treated as annuals.