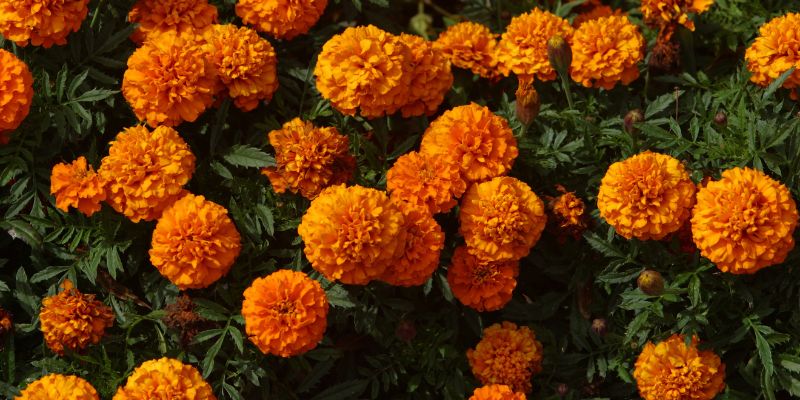
How To Plant, Grow, and Care for Marigold Flowers
Marigolds are well-loved flowers that can be found in gardens all around the world. With their vibrant colors and easy maintenance, it’s no wonder these plants have become a staple in many home gardens.
In this guide, we’ll take you through the entire process of planting, growing, and caring for marigold flowers. From choosing the right variety to proper care techniques, you’ll learn everything you need to know to successfully grow these beautiful blooms in your own garden.
Whether you’re a seasoned gardener or just starting out, this guide will provide you with all the information you need to successfully plant, grow, and care for marigold flowers
Marigold Flowers Overview
Here is an overview table for Marigold Flowers:
| Attributes | Details | Planting and Care |
|---|---|---|
| Plant type | Annual | Attracts |
| Season | Summer to frost | Hardiness Zone |
| Pests | Aphids, whiteflies | Plant with |
| Slugs Family | Gastropoda | Planting depth |
| Exposure | Full Sun | Watering Requirement |
| Diseases | Powdery mildew, root rot | Don’t plant with |
| Genus | Tagetes | Height |
| Maturity date | 45 – 50 days after planting | |
| Maintenance | Low | |
| Species | T. erecta, T. patula, etc. | |
| Growth rate | Fast | |
| Soil type | Well-drained, fertile | |
| Native area | Mexico and Central America | |
| Plant Spacing | 8 – 16 inches apart |
Please note that certain details may vary depending on the specific variety of marigold. Always refer to the specific planting and care instructions provided when you purchase your plants.
All About Marigold Flowers
Characteristics of Marigold Flowers
Marigold flowers, known scientifically as Tagetes, are a genus of annual or perennial plants in the daisy family. A quintessential part of many ornamental gardens, they are highly prized for their vibrant spectrum of colors, which include shades of yellow, orange, red, and gold. Aside from their aesthetic appeal, marigolds are also valued for their hardiness and their ability to bloom from late spring until autumn, providing long-lasting color.
Varieties of Marigolds
There are numerous marigold varieties to choose from, each with its own unique qualities. The most commonly planted marigolds fall into two categories: the African marigolds (Tagetes erecta), which are known for their large, globe-like flowers that can sometimes grow to the size of a softball; and the more delicate French marigolds (Tagetes patula), which tend to be smaller with a more anemone-like flower form. Another notable variety is the signet marigold (Tagetes tenuifolia), with its petite, single-petaled flowers and lacy foliage.
How Marigolds Benefit Your Garden
Marigolds are not only visually pleasing but also serve several practical functions in the garden. They are renowned for their ability to repel certain pests, which makes them an excellent companion plant for vegetable gardens. Some studies suggest that marigolds may deter soil-dwelling nematodes, and many gardeners plant them with their tomatoes to prevent these microscopic worms from damaging the roots. Furthermore, marigolds attract beneficial insects like bees and butterflies, which are crucial for pollination.
Planting Conditions for Marigolds
For thriving marigold plants, gardeners should plant them in well-drained soil with ample sunlight. Marigolds prefer to bask in full sun, although they can tolerate partial shade. However, too much shade may result in fewer blooms and leggy plants. When it comes to soil, marigolds aren’t too picky but they do best in moderately fertile, well-drained soil.
How to Plant Marigold Seeds
Planting marigold seeds is a simple process. Begin by sowing the seeds directly in the ground after the last frost date for your region, or start seeds indoors about 6 to 8 weeks before the last expected frost. When planting, place the seeds about an inch apart and no more than an inch deep in the soil. Thin the seedlings once they start to grow, giving each plant enough space to develop, typically around 8 to 18 inches apart depending on the variety.
Maintenance and Care for Marigolds
Marigold flowers require minimal care. Regular watering during dry periods is necessary, but be cautious to avoid overwatering, as this can lead to root rot. Deadheading spent blooms will encourage more flowering and prevent the plants from self-seeding too profusely. Additionally, though marigolds are not particularly susceptible to pests and diseases, it’s important to watch out for common issues like powdery mildew or spider mites, especially in hot, dry climates.
By incorporating these planting and care tips, your garden will be teeming with the vibrant and joyful beauty of marigold flowers.
Marigold Flowers Varieties
Diving Deeper into Marigold Varieties
When it comes to selecting the right marigold for your garden, understanding the diverse array of varieties is key. Let’s explore these resilient blooms in further detail to help you make the most informed decision for your gardening needs.
African Marigolds (Tagetes erecta)
The African marigolds, or Aztec marigolds, are historically believed to have originated from Mexico and were then transported across the Atlantic by Spanish explorers. They are known for their large, pompom-like flowers with densely layered petals and can reach heights of up to three feet. Predominantly found in hues of bright yellow, orange, and creamy white, these robust plants make a striking addition to any space, offering a bold visual impact. The blooms have a strong, musky scent that becomes more noticeable on warm, sunny days, and though not universally loved, this fragrance can help in repelling garden pests.
French Marigolds (Tagetes patula)
French marigolds are smaller and more compact than their African counterparts, reaching only about 6 to 18 inches in height. They have a significant history, dating back to the Aztecs, who valued them for their religious and medicinal uses. Later, they made their way to France where extensive breeding improved their ornamental value. Their flowers are a mix of single and double forms and include a wide range of colors from bold yellows to deep maroons, often with multi-colored patterns. The scent of French marigolds is somewhat lighter and more citrus-like, making it more agreeable to some gardeners. They share similarities with African marigolds, including their pinnate leaves and their dislike for overly wet conditions.
Signet Marigolds (Tagetes tenuifolia)
Signet marigolds, or rock garden marigolds, are known for their delicate, lacy leaves, and dainty single-petaled flowers which have a slight lemon fragrance—more subtle and pleasant than the other varieties. These marigolds present a more wildflower-like appearance, with colors ranging from yellow to warm reds, and are particularly charming when used as a border or in containers. Their history is less documented, but like other marigolds, they are native to the Americas and have been hybridized for their ornamental appeal.
Triploid Marigolds
A result of crossbreeding between African and French marigolds, triploid varieties are sterile and put all their energy into flowering rather than producing seeds. They boast an extended blooming season and a robust nature against adverse weather. Triploid marigolds produce an abundance of large, vibrant blooms, and they combine the best attributes of both parents, including tolerances for heat and rain, as well as a resistance to many of the common marigold pests.
Each of these marigold varieties has its own set of characteristics that make them unique. Yet, they all share the classic marigold qualities we cherish—ease of growing, color variety, and pest deterrent capabilities. With such diversity, there’s a marigold to suit virtually every garden’s aesthetic and functional needs.
Marigold Flowers Care Procedures
Light Requirements for Marigolds
Marigolds thrive in full sun and require at least 6 hours of direct sunlight per day to produce their best blooms. They prefer a sunny spot that is well-exposed to the day’s natural light. If planted in an area with insufficient sunlight, marigolds may grow but will likely produce fewer flowers and have weaker stems, leading to a sparser and less vibrant display. Gardeners who live in regions with extremely hot summers may consider providing light afternoon shade to prevent the flowers from wilting or their colors from fading due to intense heat exposure.
Optimal Temperature for Marigolds
As hardy annuals, marigolds favor warm temperatures and perform best when the climate is mild to hot. They are sensitive to frost and should not be planted outdoors until all danger of frost has passed. Optimal growing temperatures range from 70°F to 75°F (21°C to 24°C) during the day. However, marigolds are quite adaptable and can sustain hotter days, provided they are well-watered. Marigolds can handle a wide temperature range at night, from about 50°F to 70°F (10°C to 21°C), but consistently cooler nighttime temperatures below 50°F (10°C) may stunt their growth or reduce flowering.
Water and Humidity Requirements for Marigolds
Marigolds have moderate water requirements. During the initial stages of growth after planting, ensure they receive regular watering to establish a strong root system. Once established, marigolds become relatively drought-tolerant, but still perform best with consistent moisture. Aim to water them at the base to avoid wetting the foliage, as this can make them susceptible to diseases such as powdery mildew.
Watering Schedule for Marigolds
A good rule of thumb is to water marigolds once a week with a thorough soaking, which encourages roots to grow deeper into the soil. During hotter and drier weeks, check the soil more often; if the top inch is dry, it’s time to water again. Reduce the frequency of watering as temperatures cool down in the fall. Overwatering can be as detrimental as under-watering, leading to root rot and a decline in plant health.
Humidity Considerations
Marigolds are not particularly humidity-loving plants, and high humidity can lead to problems with fungal diseases. They flourish in areas with moderate to low humidity, making them well-suited for arid and semi-arid climates. If you’re gardening in a region with high humidity, ensure good air circulation around the plants to mitigate fungal growth risks.
Mulching and Water Retention
Applying a layer of organic mulch around the marigold plants can help keep the soil moist and reduce the need for frequent watering. Mulch will also help keep the soil temperature stable and suppress weed growth. Be careful to leave some space around the base of the stem to prevent potential rotting.
By providing the marigolds with the correct balance of water and humidity, along with observing changes to adapt your care routine, you can promote lush, vibrant blooms and healthy plants throughout the growing season.
Soil Requirements for Marigolds
Marigolds are generally not picky when it comes to soil types; they can thrive in a variety of conditions ranging from clay to sandy soils, as long as there is good drainage. However, for optimal growth and flowering, they prefer a soil that is rich in organic matter with a neutral to slightly acidic pH level ranging from 6.0 to 7.5.
Soil Types and Textures
- Clay Soil: While marigolds can tolerate clay soil, it’s essential to enhance its texture for better drainage. Incorporating compost or well-rotted manure can improve the soil structure and provide the plants with necessary nutrients.
- Sandy Soil: This type of soil drains very quickly, which can be an advantage in preventing waterlogging. To help sandy soil retain moisture and nutrients, mix in plenty of organic matter before planting.
- Loamy Soil: This is the ideal soil for marigolds, as it retains moisture but also drains well. If you have loamy soil, simply add organic compost to provide the nutrients marigolds need for growth.
Soil pH and Nutrient Balance
Marigolds do well in a neutral to slightly acidic pH, but it’s still worthwhile to test your soil. If your soil is too acidic (pH below 6.0), add lime to raise the pH. If it’s too alkaline (pH above 7.5), sulfur or peat moss can help lower the pH to a more suitable level. Conducting a proper soil test can also inform you about the nutrient levels present and help you to decide if you need to add a balanced fertilizer at planting time.
Preparing the Soil for Marigolds
Before planting marigolds, take the time to prepare the soil correctly:
- Several weeks before planting, till the soil to a depth of 6 to 12 inches to loosen it and improve drainage.
- Remove any stones, roots, or other debris from the area.
- Add a generous amount of organic matter like compost, aged manure, or leaf mold to the soil and till it in. This step will provide marigolds with nutrients and improve soil texture.
- Conduct a soil test to determine pH and nutrient levels, adjusting as needed based on the results.
- Just before planting, rake the soil to create a smooth, level surface without any large clumps or bumps.
By following these guidelines to prepare and maintain the soil for your marigold flowers, you will promote healthy growth and an abundance of vibrant blooms throughout the growing season.
Fertilizer Requirements for Marigold Flowers
Although marigolds are not heavy feeders, proper fertilization can enhance their growth and bloom production. When choosing a fertilizer, it’s best to opt for a balanced, water-soluble type or a slow-release granular form tailored to flowering plants.
Choosing the Right Fertilizer
- Balanced Fertilizer: Look for a product with an N-P-K (nitrogen, phosphorus, potassium) ratio of 10-10-10 or similar, which ensures a balanced supply of essential nutrients.
- Slow-Release Granules: These can be applied at the beginning of the growing season and will continuously feed the marigolds over time, providing nutrients as the plants need them.
- Organic Options: For gardeners who prefer organic gardening, options like fish emulsion, bone meal, or composted manure can be excellent sources of nutrients for marigolds.
When to Fertilize Marigolds
- At Planting: If you’re planting marigolds in nutrient-rich soil amended with compost or aged manure, additional fertilizer at planting time may not be necessary.
- During the Growing Season: Generally, you should fertilize marigolds once a month during the growing season. If you are using a slow-release fertilizer, follow the package directions regarding frequency.
- Signs of Nutrient Deficiency: If your marigolds show signs of nutrient deficiency, such as yellowing leaves (nitrogen deficiency) or poor blooming (phosphorus deficiency), you may need to adjust your fertilization routine.
How to Apply Fertilizer
- Water-Soluble Fertilizer: Mix the fertilizer with water according to package instructions and apply it to the soil around the plants. Be sure to avoid getting fertilizer on the leaves to prevent burning.
- Granular Fertilizer: Scatter the granules on the soil surface around the plants, following the recommended application rate. Then, water the area deeply to help the granules dissolve and reach the roots.
- Organic Fertilizers: Apply organic fertilizers like bone meal or compost around the base of the plants, gently working it into the top layer of soil without disturbing the roots.
Fertilizer Application Best Practices
- Always water the plants thoroughly after applying granular fertilizer to prevent root burn.
- Avoid over-fertilization, which can lead to lush foliage at the expense of flower production.
- If you mulch your marigold plants, pull back the mulch temporarily while applying granular fertilizer to ensure it reaches the soil.
By adhering to these fertilizer care procedures for marigolds, gardeners can provide their plants with the proper nutrients they need to flourish. This results in not only a healthier marigold plant but also a garden filled with brilliant, eye-catching blooms.
Repotting Marigold Flowers
Repotting marigold flowers is essential to ensure they have enough room to grow and receive adequate nutrients. This care procedure often involves transferring the plants to larger containers or refreshing the soil in the existing pot. Here are the step-by-step guidelines for repotting marigolds successfully:
Choosing the Right Time to Repot
- Season: The best time to repot marigolds is in the spring when they show signs of new growth, or any time during the growing season if they become root-bound.
- Indicators: Look for roots growing out of the drainage holes, slowed growth, or signs of stress as indications that it’s time to repot.
Selecting an Appropriate Container
- Size: Choose a new pot that is 1 to 2 inches larger in diameter than the current one to allow sufficient space for root expansion.
- Material: Marigolds do well in breathable materials like terracotta or fabric pots, which help prevent overwatering. Ensure that the pot has adequate drainage holes.
The Right Soil Mix
- Use a high-quality potting mix that is well-draining and rich in organic matter. Amend the mixture with compost or a slow-release fertilizer if needed to provide extra nutrients.
Repotting Steps
- Preparation: Water the marigolds thoroughly a few hours before repotting to reduce stress and make it easier to remove the plants from their pots.
- Removing the Plant: Carefully tip the pot to the side and gently ease the marigold out, supporting the root ball and the plant’s base.
- Root Inspection: Check the roots for any signs of disease or pests and trim any excessively long or damaged roots.
- Adding Soil to the New Pot: Place a layer of fresh potting soil at the bottom of the new pot.
- Positioning the Marigold: Set the marigold in the center of the new pot, ensuring that it’s at the same depth as in the original pot. Fill in around the roots with more potting soil, gently tamping it down to eliminate air pockets.
- Watering: After repotting, water the marigold well to settle the soil and eliminate any remaining air pockets, providing a good start in its new container.
Post-Repotting Care
- Keep the repotted marigolds in a shaded area for a few days to allow them to recover from the transplant shock.
- Resume regular watering and fertilization practices once the plants show signs of new growth and adjust to their new environment.
Additional Tips
- Avoid repotting marigolds during extreme weather conditions, like intense heat or cold.
- Consider adding a layer of mulch on top of the soil to help retain moisture and control weed growth.
By adhering to these care procedures for repotting marigold flowers, gardeners can ensure that their plants have a solid foundation to continue growing and producing vibrant blooms. Proper repotting supports the health and longevity of marigolds, making them a standout feature in containers and garden spaces alike.
Propagation of Marigold Flowers
Propagating marigolds is a rewarding endeavor that allows gardeners to multiply their beautiful blooms economically. Marigolds can be propagated by divisions, cuttings, or seeds. Each method has its own set of steps that, when followed precisely, can result in healthy new plants that will add color and vibrancy to any garden space.
Propagation by Division
Marigolds grow quickly and can sometimes become crowded in their containers or garden spaces. Dividing these plants can help to alleviate this crowding and produce more plants.
- Perform divisions in the spring or early summer when plants are showing strong new growth.
- Carefully dig around the marigold clumps and lift them out of the soil, keeping as much of the root ball intact as possible.
- Separate the clumps into smaller sections, ensuring that each new section has a portion of the roots.
- Replant each division promptly into prepared soil, maintaining consistent moisture as the new divisions establish themselves.
Propagation from Cuttings
To propagate marigolds from cuttings:
- Choosing Cuttings: In early to mid-summer, select healthy, non-flowering shoots that have new growth.
- Cutting: With a sharp, clean tool, cut a 3-4 inch length of the stem at a 45-degree angle just below a leaf node, where the new roots will form.
- Preparing the Cuttings: Remove the leaves from the lower half of the cutting to prevent rot.
- Rooting Hormone: Though optional, dipping the cut end in rooting hormone can encourage root development.
- Planting: Place the cuttings in a well-draining potting mix. Lightly water the soil and cover the cuttings with a plastic bag to create a humid environment.
- Care: Keep the cuttings in a warm, bright area, avoiding direct sunlight. Ensure the soil stays moist but not waterlogged.
- Root Development: In a few weeks, check for root growth by gently pulling on the cuttings. Resistance typically indicates successful rooting.
Propagation by Seeds
Marigold seeds are another popular propagation method, given their high germination rate and ease of handling.
- Sowing Seeds: Seeds can be directly sown into the garden after the last frost, or started indoors 6-8 weeks before the last expected frost.
- Planting Depth: Sow the seeds about 1/8 inch deep in well-draining soil.
- Spacing: When planting multiple seeds, space them about 8-10 inches apart to give each plant room to grow.
- Watering: Keep the soil consistently moist but not soggy.
- Germination: Marigold seeds typically germinate within 4 to 14 days when kept at room temperature.
- Transplanting: Once seedlings develop 2-3 true leaves and are strong enough, transplant them to their final location.
Aftercare
- For all propagation methods, ensure that new marigold plants receive adequate water, sunlight, and nutrients.
- Protect the young plants from pests and extreme weather until they establish themselves.
By following these propagation methods, gardeners can expand their collection of marigolds, enjoy the process of growing these cheerful flowers from start to finish, and grow lush, blooming gardens year after year.
Care Procedures for Pruning Marigold Flowers
Pruning marigolds is an essential aspect of their care routine, which encourages bushier growth and increases bloom production. To ensure your marigolds are vibrant and healthy, follow this detailed pruning guide:
When to Prune
- Prune Early: Begin pruning marigolds when they are young to encourage a robust, branching structure.
- Regular Maintenance: Continue to prune throughout the growing season to promote blooming and maintain plant shape.
Pruning Steps
- Sterilize Your Tools: Always start with clean, sharp scissors or pruning shears to reduce the risk of spreading disease.
- Pinching Young Plants: Simply pinch off the top growth with your fingertips, removing the terminal bud to encourage side branching.
- Deadheading: Regularly remove spent flowers. Snip off the flower head just below the base or first set of leaves to prompt the marigold to produce more blooms.
- Thinning: Thin out crowded areas by cutting entire stems to the base to improve air circulation and reduce the risk of diseases.
- Shaping: If desired, prune to shape the marigolds and manage their size. However, do not over-prune as it may reduce blooming.
Post-Pruning Care
- Watering: After pruning, water the plants if the soil is dry to help them recover.
- Clean Up: Remove pruning debris from around the marigolds to prevent pests and disease.
- Monitoring: Keep an eye on your marigolds after pruning for any signs of stress or disease and take appropriate measures if needed.
Pruning for Overwintering
- End of Season Pruning: If you live in a climate where marigolds can overwinter, cut back the plants to about 6 inches above the ground after the first frost.
Additional Pruning Tips
- Avoid Over-Pruning: Be careful not to remove more than one-third of the plant at a time.
- Fertilization: After a major pruning, a light application of balanced fertilizer can support the marigold’s recovery and new growth.
By incorporating these care procedures for pruning marigold flowers into your gardening routine, you can maintain the aesthetic appeal of your marigolds while optimizing their health and flower production. Pruning not only shapes the plant but also ensures that energy is directed towards the growth of new flowers, resulting in a stunning display of color throughout the season.
Troubleshooting
Growing marigold flowers can sometimes present challenges in the form of growing problems, pests, and diseases that can impede their development and impact their vibrant display. Being prepared to identify and address these issues is essential for maintaining healthy marigold plants.
Growing Problems
- Poor Flowering: Marigolds that receive too much nitrogen might develop lush foliage at the expense of blooms. To correct this, limit nitrogen-rich fertilizer application and ensure full sunlight exposure.
- Leggy Growth: Insufficient light can cause marigolds to stretch toward the light source, resulting in weak, leggy plants. Ensure marigolds are planted in areas that receive ample sunlight and consider supplemental lighting if starting seeds indoors.
- Water Stress: Overwatering can lead to root rot, while under-watering can stress the plant, causing wilting and poor flowering. Maintain a balance with consistent, moderate watering.
Pests
- Aphids: These tiny pests can suck the sap from marigold leaves, inhibiting growth. Treat infestations with a strong blast of water, neem oil, or insecticidal soap.
- Spider Mites: Indicated by fine webbing on the plant and stippled leaves, spider mites can be managed by increasing humidity and with miticides if necessary.
- Slugs and Snails: These nocturnal pests feed on marigold leaves, leaving large holes behind. Handpicking, diatomaceous earth, or iron phosphate baits can be effective in controlling these pests.
Diseases
- Powdery Mildew: This fungal disease appears as a white powdery substance on leaves. Improve air circulation, reduce overhead watering, and apply fungicides when needed.
- Botrytis Blight: Also known as gray mold, this can cause flowers and leaves to develop a gray, fuzzy mold. Prune affected areas and dispose of them properly. Keep the plants dry and apply fungicidal sprays if necessary.
- Root Rot: Caused by excessive moisture, root rot can lead to plant collapse. Ensure good drainage in the soil and avoid overwatering.
By monitoring marigolds regularly for these common issues, gardeners can take swift action to mitigate problems and ensure that the plants thrive and maintain their ornamental appeal throughout the growing season.
Frequently Asked Questions
What is the best time of year to plant marigold seeds?
- Marigold seeds are best planted after the last frost in spring. However, you can start the seeds indoors about 6-8 weeks before the last expected frost to get a head start on the growing season.
How often should I water my marigold plants?
- Marigolds prefer a well-balanced moisture level. It’s important to water them when the top inch of soil feels dry to touch. Avoid over-watering to prevent root rot.
Do marigolds need any special type of soil?
- Marigolds are not particularly picky about soil but they thrive in well-draining soil that is fertile and has a neutral to slightly acidic pH.
Can marigolds be grown in pots?
- Absolutely! Marigolds do well in containers as long as they have enough room for root growth and the soil drains well. Just make sure to water them regularly as pots can dry out faster than garden soil.
How can I use marigolds to deter pests in my garden?
- Marigolds are known to deter certain pests, such as nematodes and whiteflies, due to their pungent scent. Plant them around the edges of your garden or interspersed with vegetables to help keep pests at bay.