How to Plant, Grow, and Care For Ranunculus
Ranunculus, also known as Persian Buttercup, is a beautiful flowering plant that produces large showy blooms in a wide range of colors. It is a popular choice for gardens and flower arrangements due to its vibrant colors and long vase life.
So get your gardening tools ready and let’s dive into the world of Ranunculus!
If you’re looking to add some color and charm to your garden or home, look no further than the Ranunculus! In this guide, we will take you through everything you need to know about planting, growing and caring for these stunning flowers.
Ranunculus Overview
Here’s an overview table for Ranunculus:
| Plant Type: Perennial | Maturity Date: 90-120 days after planting | Attracts: Bees, butterflies |
| Season: Spring | Maintenance: Moderate | Hardiness Zone: 8-10 |
| Pests: Aphids, powdery mildew | Species: Ranunculus asiaticus | Plant with: Other spring bulbs like tulips and daffodils |
| Slugs Family: N/A (Not applicable as slugs are not part of the plant’s family) | Growth Rate: Moderate | Planting Depth: 2 inches |
| Exposure: Full Sun | Soil Type: Well-drained soil | Watering Requirement: Regularly, do not let soil dry out |
| Diseases: Root rot, fungal leaf spots | Native Area: Western Asia | Don’t plant with: Plants that require dry conditions |
| Genus: Ranunculus | Plant Spacing: 4-6 inches apart | Height: 1-2 feet |
Please note that some information like ‘Slugs Family’ is not applicable to the plant as slugs are pests, not a part of the plant’s taxonomy. The information provided is general and can vary depending on the specific variety of ranunculus and local growing conditions.
All About Ranunculus
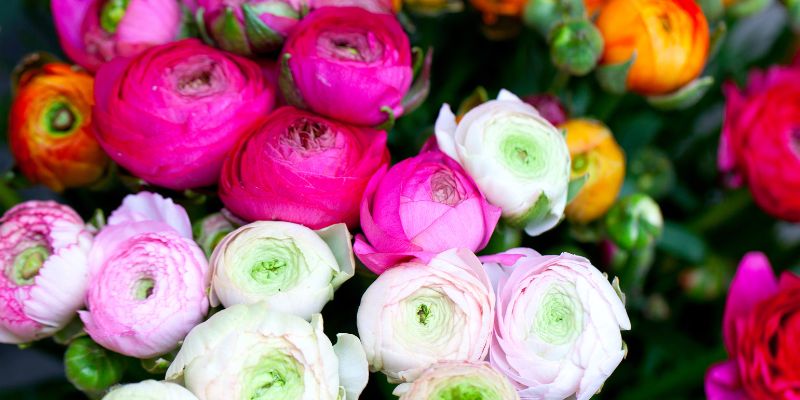
Ranunculus is part of the buttercup family, Ranunculaceae, and boasts over 600 species, displaying a diverse palette of color options, from crisp whites and sunny yellows to romantic pinks and deep reds. They are characterized by their layers of delicate, crepe paper-like petals and a mild, sweet fragrance that makes them irresistible. These perennials typically grow from corms, which are similar to bulbs, and prefer cooler spring or fall climates, depending on the region.
The optimal time to plant ranunculus corms is in the fall if you live in a milder climate with minimum frost, or in early spring for cooler areas, right after the last frost date. They thrive in full sun and require well-drained soil to prevent rot. When preparing the garden bed for ranunculus, it’s crucial to loosen the soil and incorporate organic matter to promote healthy growth. Good airflow around the plants is vital, as it helps stave off fungal diseases which can affect crowded plants.
Ranunculus plants typically reach between 12 to 24 inches in height and are splendid as cut flowers due to their long stems and lasting freshness. It’s also worth noting that while they’re a spectacle for the eyes, all parts of the plant are toxic when ingested, so caution should be exercised around pets and children.
To promote abundant blooms, regular feeding with a balanced, low-nitrogen fertilizer is advisable during the growing season. Monitoring for common garden pests such as aphids and taking action immediately upon detection will help ensure the health and beauty of ranunculus. With the right care, they make for a striking display in gardens or as cut flowers in arrangements, embodying the very essence of spring’s renewal and beauty.
Ranunculus Varieties
Amongst the ranunculus family, there are several varieties that are particularly esteemed for their unique qualities. The ‘Tecolote Ranunculus’ are known for their giant, rose-like blooms and are a classic choice for a show-stopping garden display. Originating from the coastal regions of southwestern Asia, their history is steeped in the lore of Persian legends where it is said they sprouted from the tears of a prince in love.
The ‘La Belle Ranunculus’ is another captivating variety, adorned with ruffled petals that create a ball-like appearance. Their scent is subtle but sweet, inviting you to lean in closer for a delicate whiff. ‘La Belle’ varieties come in an assortment of hues ranging from blushing pinks to radiant oranges. These varieties share a lineage that is often traced back to wild species found in the Middle East, illustrating the extensive horticultural journey from wildflower to cultivated beauty.
Another variant, the ‘Bloomingdale Ranunculus’, is a shorter but equally enchanting type recognized for its early blooms. Despite their more petite stature, they are prolific bloomers and can produce a surprisingly large number of flowers per plant. The ‘Bloomingdale’ offers a lightly fragrant addition to the ranunculus family, contributing a touch of elegance without overwhelming the senses.
While these varieties each hold their own distinctive appeal, they all share the ranunculus genus trademark features: a plethora of petals, an almost ethereal delicacy, and a gracefulness that has enchanted gardeners for generations. All ranunculus varieties boast a similar growing habit, preferring cool temperatures and well-drained soil, making them a cohesive group regardless of their individual differences.
Ranunculus Care Procedures
Ranunculus Care Procedures: Light and Temperature
Ensuring that your ranunculus receives the right amount of light and is grown in a suitable temperature is critical for their thriving existence. These plants bask in full sunlight, with at least six to eight hours of direct sun per day being ideal. An ample amount of light is crucial for the development of tight, compact foliage and for stimulating abundant, vibrant blooms. However, if you reside in an area with particularly intense summer heat, providing some afternoon shade will help protect your plants from scorching and stress.
When it comes to temperature, ranunculus flourishes in cooler climates and should be planted when the soil is cool to the touch. A general guideline is to aim for temperatures between 50°F and 75°F (10°C and 24°C). This temperature range allows for optimal growth without the risk of overheating the plants or promoting premature bolting, where a plant grows rapidly and goes to seed, thus compromising the blooms. Care should be taken to avoid planting when there’s still a risk of hard frost, as it can damage the corms and young shoots. If a sudden unexpected frost is forecasted after planting, protect your ranunculus with frost cloths or mulch.
In areas with warm winters, plant ranunculus corms in the fall for spring blooms, as the cool winter temperatures will provide a natural vernalization period, which is a cold treatment necessary for the plant to flower profusely. Conversely, in regions with cold winters, planting should be done in early spring, after the danger of frost has passed. In these cases, chilling the corms before planting can mimic their preferred cold conditions, enhancing germination and subsequent growth.
Remember that the right balance of sunlight and cool temperatures not only influences the flowering success but also impacts the plant’s overall health, making this aspect of care an essential part of growing lush, striking ranunculus in your garden.
Ranunculus Care Procedures: Water and Humidity
Adequate watering and humidity control are pivotal to the health and vibrancy of ranunculus plants. These plants prefer consistent moisture, but they are also highly sensitive to overwatering which can lead to rot, especially in the corms. To strike the right balance, aim to keep the soil uniformly moist but not waterlogged. This usually means watering deeply once a week, but the frequency should be adjusted depending on weather conditions and soil type. A well-draining soil mixture will aid in preventing excess water from pooling around the roots.
Upon planting, water your ranunculus thoroughly to settle the soil around the corms. Thereafter, it’s key to allow the top layer of soil to slightly dry out between waterings, which encourages strong root growth. Implementing a drip irrigation system or using a soaker hose can provide gentle, consistent moisture while keeping foliage dry, which is important for avoiding leaf diseases.
When it comes to humidity, ranunculus does not have specific requirements; they are quite adaptable. However, it’s essential to maintain good air circulation around the plants to deter fungal infections, which can thrive in humid environments. Make sure to space the plants adequately during planting, and consider thinning out dense foliage if necessary.
Moreover, during rainy periods, be vigilant and reduce watering as needed to accommodate for the increased natural water supply. Conversely, in times of drought or extreme heat, more frequent watering may be necessary to maintain the moisture level that ranunculus plants crave for optimum growth and bloom development.
In summary, regular monitoring of soil moisture and adjusting your watering routine to ensure the optimal balance will result in a thriving ranunculus display that will enhance your garden with its colorful and lush blooms.
Ranunculus Care Procedures: Soil Type, pH, and Preparation
Soil Type and Texture
Ranunculus plants thrive best in soil that is fertile and well-draining. The optimal soil for ranunculus is a loamy mixture, which combines sand, silt, and clay in balanced proportions, providing good drainage while retaining adequate moisture and nutrients. If you have sandy soil, it’s beneficial to add organic matter to improve nutrient content and moisture retention. On the other hand, clay-heavy soils can be amended with sand and organic matter, like compost or aged manure, to enhance drainage and prevent water from pooling around the corms which can cause rot.
pH Requirements
Ranunculus prefers a slightly acidic to neutral pH range, ideally between 6.0 to 7.0. Testing your soil’s pH level before planting can be very helpful. If the soil is too alkaline, incorporating elemental sulfur can help lower the pH. Conversely, if the soil is too acidic, adding lime can help to raise the pH level. Making these adjustments well in advance of planting will give your soil time to achieve the perfect pH balance for your ranunculus.
Soil Preparation
Preparing the soil for ranunculus is crucial for successful growth. Start by removing any weeds or debris from the planting area. Till the soil to a depth of about 8 to 12 inches to loosen it and ensure that it is well-aerated, which will promote healthy root development. Amend the soil with generous amounts of organic matter; well-composted materials are preferable, as they will improve the soil structure and provide nutrients. Incorporate a balanced, slow-release fertilizer at planting time to give your ranunculus an additional boost.
Ensure good drainage by raising planting beds if necessary, especially in areas prone to heavy rains. Creating raised beds or ridges can help to prevent water from accumulating at the root level. Lastly, once corms are planted, mulching with organic material can help to maintain consistent soil temperature and moisture, reduce weed competition, and contribute to a slow release of nutrients into the soil.
By paying attention to soil type, pH, and proper preparation, you can create an ideal grounding for ranunculus, encouraging robust growth and a stunning floral display. Remember that ongoing soil care is just as important as initial preparation, so continue to nurture your soil to support the health and beauty of your ranunculus plants season after season.
Ranunculus Care Procedures: Fertilization
Proper fertilization is essential to ensure the vibrant blooms and healthy growth of ranunculus plants. When selecting a fertilizer, opt for a balanced, slow-release formulation with an equal ratio of nitrogen (N), phosphorous (P), and potassium (K), such as a 10-10-10 or a 5-5-5 blend. Nitrogen encourages lush foliage growth, phosphorous is crucial for strong root development and blooming, while potassium supports the plants’ overall vigor and disease resistance.
Fertilizer Application Schedule:
Commence fertilization shortly after the corms sprout, as this is when the plants begin to actively grow and will benefit from the extra nutrients. A light application of a granular slow-release fertilizer around the base of the plants can be made every four to six weeks during the growing season, ensuring that you refrain from over-fertilizing, which can lead to poor bloom production and potential salt damage to the roots.
Liquid Fertilizers:
Alternatively, you may use a liquid fertilizer diluted to the recommended strength, applied every two to three weeks. This is particularly effective as it provides nutrients that are immediately available to the plants. Be cautious to avoid getting fertilizer on the plant’s foliage as this can cause burns; instead, apply directly to the soil around the plant.
Organic Options:
For gardeners who prefer organic practices, well-composted manure or a compost tea can be excellent sources of nutrients. Bone meal is another organic option beneficial for enhancing phosphorous levels, which is especially important for encouraging abundant blooms.
Monitoring for Deficiencies:
Observe your ranunculus plants for signs of nutrient deficiencies, which may present as discoloration of the leaves, poor growth, or a lack of flowering. Nitrogen deficiency, for instance, may cause yellowing of older leaves, whereas a lack of phosphorous can result in stunted growth.
Soil Testing:
Periodic soil testing can be invaluable in determining the specific nutrient needs of your garden. Based on the results, you may need to adjust the type or quantity of fertilizer applied to suit your soil conditions and the specific needs of your ranunculus plants.
Considerations for Ending Fertilization:
As the blooming season concludes, taper off fertilization to allow the plants to naturally prepare for dormancy. Additional feeding at this stage can lead to unnecessary stress on the plants as they wind down their growth cycle.
By following a thoughtful fertilization regimen, you provide your ranunculus with the necessary resources to thrive. Remember, the goal is to supplement the natural nutrients found in your soil to create the optimal conditions for growth rather than to rely solely on fertilizers. With careful application and observation, fertilization will support the health and beauty of your ranunculus, rewarding you with spectacular blooms through the growing season.
Ranunculus Care Procedures: Repotting
Repotting ranunculus is an important aspect of ensuring the prolonged health of these charming plants, especially when grown in containers. This process provides fresh nutrients for the plants and encourages continued growth. Here is a step-by-step guide to repotting ranunculus:
Choosing the Right Time:
The best time to repot ranunculus is in the fall when the plants have completed their blooming cycle and have started to die back, indicating they’re going into dormancy. Alternatively, repot in the early spring before new growth starts.
Selecting a New Container:
Choose a container that is slightly larger than the current one to give your ranunculus more room to grow. Ensure the container has adequate drainage holes to prevent waterlogging of the soil, which can lead to root rot.
The Repotting Process:
- Prepare the new pot by filling it with a high-quality potting mix that drains well. You may also add a layer of gravel or similar material at the bottom to enhance drainage.
- Gently remove the ranunculus from its current container, being careful not to damage the roots or corms.
- Examine the root system and corms, trimming away any dead or diseased parts with sterile scissors or pruners.
- If the plant has multiplied and formed clusters of corms, you can divide them at this point, ensuring each section has at least one growth point.
- Position the ranunculus corms in the new pot at the same depth they were previously growing and space them properly to allow for expansion.
- Fill in around the corms with potting mix, firming gently to remove air pockets.
- Water the newly potted ranunculus thoroughly to settle the soil around the corms. After watering, allow any excess water to drain away completely.
Post-Repotting Care:
After repotting, keep the soil moist but not soggy, and place the pot in a location with bright, indirect light. Avoid fertilizing immediately after repotting to give the roots time to re-establish. Monitor your repotted ranunculus for any signs of stress and adjust care as necessary.
By adhering to these repotting guidelines, your ranunculus should continue to prosper in its new home, offering a spectacular display of color and beauty in your garden or living space.
Ranunculus Care Procedures: Propagation
Propagation is a rewarding way to create new ranunculus plants and can be achieved through various methods such as division, cuttings, or from seeds. Each approach requires attention to detail to ensure successful growth of these delightful flowers.
Propagation by Division:
As mentioned in the repotting section, division is commonly used for propagating ranunculus. Here is how you can do it:
- Timing: Choose to divide ranunculus in the fall when the plants are dormant. This minimizes stress on the plants and allows them to recover during the cool months.
- Digging up Corms: Carefully dig up the ranunculus corms, being cautious not to damage them.
- Separation: Gently separate the corms that have naturally multiplied. Each corm should have at least one eye or growth point.
- Preparation: Trim any excessively long roots and remove the dead foliage before planting the individual corms.
Propagation from Cuttings:
Taking cuttings is another viable method for propagating ranunculus, especially for varieties that produce stems suitable for cutting:
- Select Healthy Stems: Choose healthy non-flowering stems for taking cuttings.
- Cut: Use a sharp and clean knife or scissors to cut a 4-6 inch piece of stem, just below a leaf node.
- Rooting: Dip the cut end of the stem in rooting hormone and then insert it into a pot filled with moist, sterile potting mix.
- Care: Keep the pot in a warm, bright space but out of direct sunlight. The soil should be kept consistently moist. Roots usually develop within a few weeks.
Propagation from Seeds:
Growing ranunculus from seeds can be a longer process but is rewarding for its variety:
- Seed Collection: If you have existing ranunculus plants, you can collect the seeds once the pods dry and open. Alternatively, purchase seeds from a reputable supplier.
- Sowing: Sow seeds in late summer or early fall. Use seed starting mix in trays and lightly cover the seeds with soil. Keep the soil moist but not waterlogged.
- Germination: Place the seed tray in a warm area to encourage germination. This process can take a couple of weeks.
- Care Post-Germination: Once seedlings emerge and grow strong enough, transplant them to individual pots and care for them as you would adult plants.
Post-Propagation Care:
Regardless of the method chosen, once your new ranunculus plants are established, provide them with regular care as described in previous sections, including proper watering, adequate sunlight, and timely fertilization.
By following these propagation techniques, gardeners can expand their collection of ranunculus, enjoying the burst of color and elegant blooms these plants have to offer. Each method has its own set of challenges and rewards, but the result of successful propagation is always gratifying.
Ranunculus Care Procedures: Pruning
Pruning ranunculus is an important aspect of care that encourages healthy growth and prolongs the blooming period. Here’s a detailed guide on how to prune these colorful plants effectively:
Understanding the Purpose of Pruning:
Pruning ranunculus involves the removal of spent blooms, dead or diseased foliage, and thinning of the plant if necessary. This not only improves the plant’s appearance but also prevents disease spread and encourages the redirection of energy to more blooms and robust growth.
When to Prune Ranunculus:
The ideal time to prune ranunculus is after they have finished blooming. This typically occurs in late spring or early summer, depending on your climate. Additionally, deadheading (removal of spent flowers) can be done throughout the blooming season to maintain a tidy appearance and promote further flowering.
Step-by-Step Pruning Guide:
- Prepare Your Tools: Ensure that you have a pair of sharp, clean pruning shears or scissors. Clean tools are critical to avoid spreading disease from plant to plant.
- Removing Spent Blooms (Deadheading): Regularly check the plant for faded or dead flowers. Snip these off at their base or back to the first set of healthy leaves. This will encourage the plant to produce more blooms.
- Pruning for Health: Remove any yellowed, browned, or diseased leaves by cutting them at the base of the stalk. This helps to improve air circulation and deters pest infestations.
- Thin Out Overcrowded Areas: If certain areas of the plant are too dense, carefully thin out some of the foliage to promote better air flow and light penetration.
- Shaping the Plant: If desired, you can shape the plant by selectively pruning to promote a more compact and balanced growth form.
Post-Pruning Care:
After pruning, dispose of all plant debris to prevent the potential spread of disease. Make sure to water your ranunculus appropriately and continue with regular care. Providing a balanced fertilizer after pruning can support the plant in its recovery and new growth.
Seasonal Pruning:
As the growing season ends and plants begin to yellow naturally, you can cut the entire plant back to the soil level once it has died back completely. This is usually done in the fall. Compost the old foliage unless it’s diseased.
By practicing thoughtful pruning, gardeners can help their ranunculus thrive and contribute to a spectacular garden display season after season. It’s a simple yet effective way to maintain the health and beauty of these cherished blossoms.
Troubleshooting
Ranunculus Troubleshooting Guide:
Growing enchanting ranunculus can occasionally present some challenges. By being well-versed in common problems and their solutions, gardeners can keep their plants thriving and blooming to their full potential. This guide will delve into the issues of growing problems, pests, and diseases that might afflict these plants, providing a comprehensive troubleshooting framework.
Growing Problems:
Ranunculus can sometimes struggle due to environmental stressors or care mistakes:
- Poor Blooming: Inadequate sunlight or excessive nitrogen-rich fertilizer can lead to lush foliage at the expense of blooms. Ensure your ranunculus receive full sun and balance their nutrients.
- Stunted Growth: This may derive from overcrowded conditions. Thin out your plants to allow sufficient space for growth and adequate air circulation.
- Bulb Rot: Overwatering, especially in poorly draining soil, can cause the corms or tubers to rot. Plant in well-draining soil and moderate your watering schedule.
Pests:
Pests can be detrimental to the health of ranunculus but are manageable with vigilance:
- Aphids: These small insects can siphon sap from the plants, weakening them and possibly spreading viruses. A strong spray of water or application of insecticidal soap can help to control them.
- Snails and Slugs: These pests can cause significant damage by eating leaves and flowers. Strategies like setting up traps, spreading diatomaceous earth, or using molluscicides can mitigate their impact.
Diseases:
Diseases in ranunculus plants can often be prevented with good cultural practices:
- Botrytis Blight (Gray Mold): This common fungal disease can be identified by a gray, fuzzy mold on leaves or blooms. Good air circulation, reduced humidity, and proper sanitation can greatly reduce the risk.
- Powdery Mildew: It appears as a white powdery substance on leaves. This can be diminished by increasing air flow around the plants and applying fungicides should it occur.
By closely monitoring your ranunculus plants and responding quickly to any of the issues outlined above, you can overcome many of the common challenges associated with these captivating flowers. With the right approach to detection and treatment, your ranunculus will continue to be a highlight in your garden with their vibrant and voluminous blooms.
Frequently Asked Questions
What is the best time to plant ranunculus bulbs?
The best planting time for ranunculus bulbs, or corms, is in the fall if you live in a mild climate with frost-free winters. In cold climates, plant the corms in early spring, as soon as the danger of hard frost is over.
How often should ranunculus be watered?
Ranunculus should be watered regularly to keep the soil moist but not waterlogged. After planting, water thoroughly, and then wait until the top of the soil begins to dry out before watering again. Overwatering can lead to bulb rot, so ensure good drainage.
Can ranunculus grow in pots?
Yes, ranunculus grows well in pots with drainage holes. Use a high-quality potting mix and ensure the pot is deep enough to accommodate the roots. Regular watering and fertilization are key to vibrant blooms.
Do ranunculus come back every year?
Ranunculus are perennial in zones 8-10, where they can come back yearly. In colder zones, they’re often grown as annuals unless the corms are lifted and stored over winter to be replanted the following spring.
How long will ranunculus blooms last?
Cut ranunculus flowers can last 7-10 days in a vase with fresh water. On the plant, blooms last a few days to a week, but deadheading spent flowers will encourage more blooms for a prolonged display.

