Painted Daisy: Growing An Abundance Of Pyrethrum
Over the past few years, a little yellow daisy with a big potential has steadily taken over a corner of my garden. What began as just a handful of Painted Daisy seedlings has exploded into an abundant crop that now coats the ground in a blaze of yellow color. This unassuming flower known as Pyrethrum is not only beautiful to look at but also has some incredible properties that can benefit both humans and the environment.
In this post, I’ll share how I have grown this hardy perennial from seed to flowering bounty and discovered the many useful aspects of this plant that make it well worth cultivating an abundance of in more gardens.
Painted Daisy Overview
| Feature | Description |
|---|---|
| Common Name(s) | Painted Daisy, Pyrethrum, Tanacetum |
| Scientific Name | Tanacetum coccineum |
| Family | Asteraceae |
| Height | 1-3 feet |
| Light | Full sun to partial shade |
| Water | Moderate; Allow the top inch of soil to dry out before watering again |
| Soil | Well-draining soil. It prefers slightly acidic to neutral pH levels |
| Fertilizer | Apply a balanced fertilizer in early spring before new growth starts |
| Pests and Diseases | Generally pest-resistant. However, it can be vulnerable to aphids, leaf miners, and powdery mildew |
Note: This is a general overview and conditions may vary based on your location and the specific variety of Painted Daisy. Always consult with a local nursery or extension service for the best practices in your area.
All About Painted Daisy

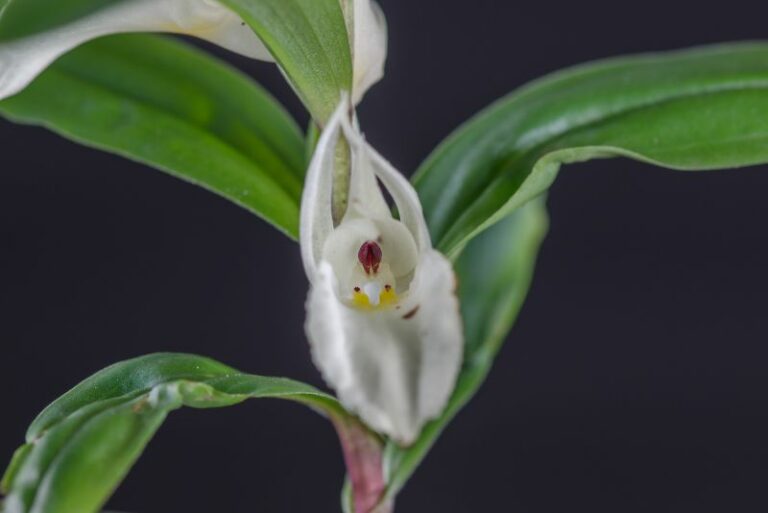
The Painted Daisy, known scientifically as Tanacetum coccineum, originates from southwestern Asia. It is a versatile perennial that can thrive in a variety of climates, as long as it has access to full sun and well-drained soil. This flamboyant plant blooms vigorously from late spring to early summer, showcasing an array of colors from vibrant yellows and pinks to deep reds.
Interestingly, the Painted Daisy is not just a pretty face. It carries significant ecological benefits, attracting pollinators such as bees and butterflies to your garden, thereby supporting local biodiversity. This plant is also known for its distinctive aroma that has a potent deterrent effect on many common garden pests.
In terms of care, the Painted Daisy is a low maintenance plant, perfect for both novice gardeners and those with a busy lifestyle. It is drought-resistant and relatively disease-free, providing a hassle-free gardening experience. However, regular deadheading can encourage a more prolific bloom, and periodic division every few years can ensure the plant’s health and vitality.
Besides its ornamental and ecological benefits, the Painted Daisy has also been used for centuries for its medicinal properties. Its flowers are rich in pyrethrins, natural compounds known for their insecticidal properties. These compounds are often used in organic farming and in products designed to control household pests.
In summary, the Painted Daisy is a wonderful addition to any garden. Besides its visual appeal, its low maintenance needs, ecological benefits, and medicinal properties make it a plant with remarkable versatility. Whether you are a seasoned gardener or a beginner, the Painted Daisy is a plant that will undoubtedly bring value to your garden.
Varieties of Painted Daisy
There are several varieties of Painted Daisy, each with its unique characteristics, ranging from their historical background, appearance, scent, and similarities. Let’s take a closer look at some of the most popular varieties:
1. Robinson’s Red
Robinson’s Red, named after the eminent British horticulturist, William Robinson, is a popular variety that graces many gardens. It is known for its vibrant crimson petals and a yellow eye. This variety tends to be taller than others and emits a mild, pleasant fragrance, akin to fresh cut grass.
2. James Kelway
The James Kelway variety is named after the renowned British nurseryman, James Kelway. It has a rich history, famous for its vivid yellow petals that surround a yellow, fluffy center. Its scent is mild and agreeable, and its flowers are often considered the classic representation of the Painted Daisy.
3. Robinson’s Mix
Robinson’s Mix is a delightful blend of Robinson’s Red, Robinson’s Pink, and Robinson’s White. This mix offers gardeners an opportunity to enjoy a variety of colors in their garden. The scent is similar to the rest of the Robinson varieties – pleasantly mild and not overpowering.
4. Single Mix
Single Mix Painted Daisy offers a colorful medley of single, vibrant flowers in shades of red, pink, and white. It’s loved for its simplicity and elegant look. Like most Painted Daisy varieties, it has a soft, pleasing scent that adds an extra layer of sensory appeal to any garden.
All these varieties share certain common traits. They all require similar growing conditions – full sun and well-drained soil, are excellent for attracting pollinators, and possess the distinctive aroma that repels pests. Despite their differences in color and naming history, one thing remains constant – their power to transform your garden into a riot of color and activity for pollinators.
Painted Daisy Care Procedures

In order to fully enjoy the beauty and benefits of Painted Daisies, it’s important to ensure proper care for these plants. Here are some tips to keep your Painted Daisies thriving:
Light and Temperature
Painted Daisies thrive in full sunlight, which means they need at least six hours of direct sun exposure every day. They can tolerate some amount of partial shade, especially in the hot midday sun during the peak of summer, but insufficient light can lead to leggy stems and reduced blooming.
As for temperature, Painted Daisies are hardy plants that can withstand a range of temperatures. They grow best in moderate climates, with temperatures between 60 to 75 degrees Fahrenheit being ideal. However, they are frost-tolerant and can survive temperatures down to -30 degrees Fahrenheit. In regions with extreme heat, it’s advisable to provide some afternoon shade to prevent the plants from wilting.
Remember to adjust watering schedules based on temperature fluctuations. In hotter conditions, water more frequently to prevent the soil from drying out, but be cautious not to overwater. During the cooler months, reduce watering and ensure that the soil is well-drained to avoid waterlogging and root rot.
By maintaining the right balance of light and temperature, your Painted Daisies will flourish and continue to add color and life to your garden.
Water and Humidity
When it comes to watering, the Painted Daisy prefers well-drained soil and does not respond well to overwatering. From spring through fall, water the plants thoroughly once the top inch of the soil has dried out. It’s advisable to water in early morning or late evening to minimize evaporation loss. During the winter months, the watering frequency can be reduced significantly, as the plant enters a dormant state.
The Painted Daisy’s ideal watering technique is deep watering, which encourages the roots to grow deeper into the soil, making the plant more drought-tolerant. To do this, water the plant slowly and steadily until you notice water starting to seep out from the bottom of the pot or the soil around the plant in the ground begins to look saturated. This technique ensures that the water reaches the deeper root zones instead of just moistening the surface.
Humidity doesn’t play a significant role in the Painted Daisy’s care regimen. These plants are quite tolerant of different humidity levels and can thrive in both moderately humid and relatively dry conditions. However, in exceptionally humid climates, it’s essential to ensure proper soil drainage and air circulation around the plants to prevent fungal diseases.
Remember to always adjust your watering and care strategies based on the local climate and seasonal changes. Doing so will ensure your Painted Daisies remain healthy, vibrant, and continue to brighten up your garden year after year.
Soil Type, pH, and Preparation for Painted Daisy
The Painted Daisy is quite adaptable and can thrive in a variety of soil conditions, but there are a few essentials to keep in mind for the best results.
Soil Type
Painted Daisies prefer well-drained soil. They can thrive in sandy or loamy soil types, which are known for their excellent drainage properties. Clay soils, which can retain more water, might not be the best fit unless they are improved with organic matter to enhance their drainage.
Soil pH
The ideal soil pH for Painted Daisies ranges between 6.0 and 7.0, which is slightly acidic to neutral. You can test the soil pH using a home testing kit available at most gardening stores. If the soil is too acidic (below 6.0), you can add lime to raise the pH. If it’s too alkaline (above 7.0), adding sulphur or organic matter like compost can help lower the pH.
Preparing the Soil
Proper soil preparation is crucial for the healthy growth of Painted Daisies. Start by clearing the planting area of weeds and other debris. Dig the soil up to a depth of 12-15 inches and break up any large clumps. If the soil is heavy clay, amend it with organic matter like compost or well-rotted manure to improve its texture and drainage properties. If your soil is too acidic or alkaline, this is the time to adjust its pH by adding lime or sulphur, respectively.
Once you’ve prepared the soil, you can plant your Painted Daisies. Dig a hole that’s twice as wide and just as deep as the root ball of your plant. Place the plant into the hole, ensuring that the top of the root ball is level with the soil surface. Backfill the hole with the amended soil and firm it gently around the base of the plant. Water thoroughly to settle the soil around the roots.
By considering these factors and preparing the soil appropriately, you can create an optimal growing environment for your Painted Daisies, allowing them to flourish and bring color and beauty to your garden.
Fertilization of Painted Daisy
To ensure vibrant growth and abundant flowering of your Painted Daisies, appropriate fertilization is crucial. These plants are not heavy feeders and using a balanced fertilizer can be sufficient to provide them the nutrients they need.
Type of Fertilizer
A slow-release fertilizer with a balanced ratio such as 10-10-10 (Nitrogen-Phosphorus-Potassium) is ideal for Painted Daisies. This type of fertilizer will steadily release nutrients over several months, providing continuous nutrition for the plants.
Fertilization Schedule
The optimal time to fertilize Painted Daisies is in the early spring, just as the plants are starting to grow. Apply the slow-release fertilizer according to the package instructions, typically around the base of the plants. Avoid getting fertilizer on the foliage as it can cause burns.
For the most vigorous plants and best flower production, a second application of fertilizer can be beneficial in the early summer, just before the onset of the blooming period.
Applying the Fertilizer
When applying the fertilizer, spread it evenly around the base of the plants, keeping it a few inches away from the stem to prevent burning. After application, water thoroughly to help the fertilizer penetrate the soil and reach the root zone of the plants.
Remember, over-fertilizing can be detrimental, leading to weak, leggy growth and fewer flowers, so it’s important to follow the fertilizer package instructions and resist the temptation to over-feed.
By adhering to these fertilization guidelines, you can ensure that your Painted Daisies have the nutrients they need to provide vibrant colors and lush growth throughout the growing season.
Painted Daisy Care: A Detailed Guide to Repotting
Painted Daisies not only add a splash of color to your garden but can also thrive in pots, making them ideal for indoor plant enthusiasts. Here’s a step-by-step guide on how to repot your Painted Daisies:
- Selecting the Right Pot: Choose a pot that is one size larger than the current one. It should have adequate drainage holes to prevent waterlogging. Ceramic or terracotta pots are excellent choices as they are breathable and promote healthy root growth.
- Preparing the New Pot: Layer the bottom of the new pot with a small amount of fresh, well-draining potting soil.
- Removing the Plant: Water your Painted Daisy thoroughly a day before you plan to repot it. This helps ease the shock of transplanting. Carefully remove the plant from its current pot by turning it sideways, holding it gently by the stems, and tapping the bottom of its container until the plant slides out.
- Inspecting the Root Ball: Once you have the plant out of its pot, inspect the root ball. If the roots are tightly wound around the soil, gently tease them apart with your fingers to stimulate new growth.
- Planting in the New Pot: Position the plant in the new pot. The top of the root ball should sit below the rim of the pot. Fill the space around the root ball with potting soil, tamping down gently until the plant stands upright and the root ball is covered.
- Post-Repotting Care: After repotting, water your Painted Daisy thoroughly and place it in a location with indirect sunlight. Avoid fertilizing immediately after repotting to prevent root burn.
Remember, the best time to repot the Painted Daisy is in early spring, when the plant is beginning to grow. Regular repotting, ideally every 2-3 years, will help keep your Painted Daisy healthy and vibrant.
Painted Daisy Propagation: A Comprehensive Guide
Propagating the Painted Daisy can be successfully achieved through division, cuttings, or growing from seeds. This guide outlines the steps for each method:
Division
- When to Divide: The optimal time for division is in the early spring, when the Painted Daisy is starting to grow.
- How to Divide: To divide your plant, carefully dig around the base to lift the clump without damaging the roots. Split the clump into smaller pieces, ensuring each piece has healthy roots and at least one stem. Replant the divisions as quickly as possible.
Cuttings
- Choosing and Preparing the Cutting: In early summer, select a healthy, disease-free stem and cut a 4-6 inch piece just below a leaf node. Remove leaves from the lower half of the cutting.
- Rooting the Cutting: Dip the cut end in rooting hormone, then plant it in a pot filled with a mix of perlite and peat moss. Keep the cuttings in a warm, bright place, but out of direct sunlight until roots develop.
Seeds
- Sowing the Seeds: In early spring, sow your Painted Daisy seeds indoors in a seed tray filled with well-drained seed starting mix. Sprinkle the seeds on top and cover lightly with the mix.
- Germination: Place the tray in a location with warm, indirect light. Maintain consistent moisture until germination occurs, usually within 1-2 weeks.
- Transplanting Seedlings: Once the seedlings have developed a second set of true leaves, they can be carefully transplanted into individual pots.
Regardless of the propagation method, remember to provide your new Painted Daisy plants with the same care and attention as your original, including appropriate watering, fertilizing, and positioning in a location with adequate sun. With patience and care, your propagated Painted Daisies should soon flourish, bringing their vibrant color and charm to new areas of your garden or home.
Painted Daisy Pruning: A Comprehensive Guide
Pruning is a critical part of Painted Daisy care that encourages better airflow, reduces the risk of disease, and helps the plant focus its energy on producing vibrant and healthy flowers. Here is a step-by-step guide on how to prune your Painted Daisies:
- When to Prune: The optimal time to prune Painted Daisies is in the early spring just before new growth begins, although light pruning can be done throughout the growing season to remove spent flowers and maintain the plant’s shape.
- Preparing to Prune: Before you begin, ensure that your pruning tools are clean and sharp to avoid damaging the plant or transmitting diseases. You might need a pair of garden shears for larger stems and a pair of secateurs for smaller and delicate stems.
- Identify What Needs to be Pruned: Look for dead, diseased, or damaged stems that need to be removed. Also, consider stems that are growing out of the desired shape or size of the plant.
- Making the Cut: When pruning, make your cuts at a 45-degree angle about 1/4 inch above a bud that is facing the outside of the plant. This encourages new growth to sprout in that direction, keeping the middle of the plant open and airy.
- Deadheading: Throughout the flowering season, regularly remove spent flowers (a process known as deadheading) to encourage the plant to produce more blooms. Snip off the faded flowers at their base, being careful not to damage the surrounding stems or buds.
- Post-Pruning Care: After pruning, give your plant a thorough watering and consider a light application of balanced fertilizer to support new growth.
- Monitoring: Keep an eye on your Painted Daisy after pruning. Signs of new growth indicate that your plant has responded well to the pruning.
Remember, while pruning is beneficial, over-pruning can stress the plant and reduce flowering. Always aim to remove no more than one-third of the plant’s total growth in a single pruning session.
Troubleshooting
Troubleshooting begins with understanding the plant’s needs and monitoring it closely for any signs of distress. The key issues that affect Painted Daisies can be divided into three main categories: growing problems, pests, and diseases.
Growing Problems
- Poor Flowering: If your Painted Daisy is not blooming well, this could be due to inadequate sunlight or nutrition. Ensure the plant is receiving full sun for at least 6 hours a day and is fertilized with a balanced plant food during growing season.
- Yellowing Leaves: Over-watering is often the culprit behind yellow leaves. Ensure the plant’s soil is well-draining and only water when the top inch of soil is dry.
Pests
- Aphids: These small sap-sucking insects can cause the leaves to curl and stunt growth. They can be treated with insecticidal soap or natural predators like ladybugs.
- Slugs and Snails: These pests are attracted to the Painted Daisy’s succulent foliage, especially in damp conditions. Use organic slug pellets or barriers to protect your plants.
Diseases
- Powdery Mildew: This fungal disease manifests as a white, powdery coating on leaves and stems. Increasing airflow around the plant and treating with a fungicide can help control it.
- Root Rot: Over-watering can cause the roots to rot, leading to wilting and browning leaves. Ensure the plant is in well-draining soil and try to water less frequently.
Remember, the best form of troubleshooting is preventive care. Regularly inspect your Painted Daisy for early signs of problems and take prompt action when you notice something amiss.
Frequently Asked Questions About Painted Daisy
Q1: How often should I water my Painted Daisy?
A: Painted Daisy prefers well-drained soil, thus it doesn’t require frequent watering. Water it when the top inch of soil is dry, typically once a week during dry periods. Over-watering can lead to root rot.
Q2: Why are the leaves of my Painted Daisy turning yellow?
A: Yellowing leaves can be a sign of over-watering. Make sure you’re allowing the top inch of soil to dry out between watering sessions. If you’re watering appropriately, yellow leaves could also indicate a nutrition deficiency. In such a case, a balanced plant food can help.
Q3: How much sun does a Painted Daisy need?
A: Painted Daisies thrive in full sun, with at least 6 hours of direct sunlight each day. They can tolerate partial shade, but this may result in fewer blooms.
Q4: What should I do if my Painted Daisy is infested with aphids?
A: Aphids can be treated with insecticidal soap or by introducing natural predators like ladybugs. In minor cases, spraying the plant with a strong jet of water can also help dislodge aphids.
Q5: Why is my Painted Daisy not flowering?
A: Inadequate sunlight or nutrient deficiency can cause poor flowering. Ensure that your plant receives at least 6 hours of full sun and is fertilized during the growing season with a balanced plant food.