How to Plant, Grow, and Care For Aster Flowering Plants
If you’re searching for a flowering plant that packs serious beauty into a petite package, look no further than trusty little asters. These starry blossoms may be modest in size but they make up for it with outsized charm. Boasting sunny blooms in shades from soft pink to royal purple, asters bring a cheerful pop of color to gardens from summer to fall. While their delicate flowers seem fussy, asters are actually quite hardy — though they don’t mind the attention either.
In this post, I’ll share my tried-and-true tips for planting, growing, and caring for these pint-sized perennials so you can experience the joyous aster effect all season long without losing your cool. Read on to bring more vibrancy to your garden on a budget of beginnings.
Aster Overview
| Features | Description |
|---|---|
| Common Name(s) | Asters, Starwort, Michaelmas Daisy |
| Scientific Name | Asteraceae |
| Family | Asteraceae |
| Height | Varies by species; typically 1-6 feet |
| Light | Full sun to partial shade |
| Water | Medium; keep soil consistently moist but well-drained |
| Soil | Prefers well-drained, fertile soil; can tolerate sandy, loamy, and clay soils with a neutral to slightly alkaline pH |
| Fertilizer | Use a balanced flower fertilizer during growing season |
| Pests and Diseases | Can be affected by powdery mildew, rust, and aster yellows; pests include aphids and leafhoppers |
Please note that these are general care instructions and may vary based on specific species and local climate conditions. Always research the exact type of aster you have for best care practices.
All About Asters
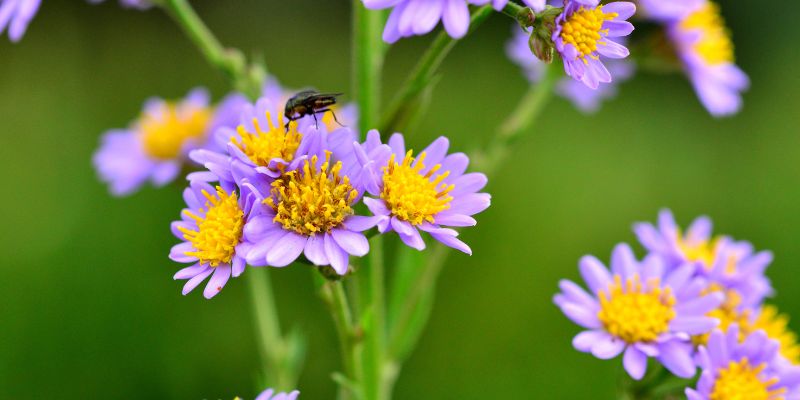
Asters, belonging to the family of Asteraceae, are star-shaped flowers that come in a wide variety of colors, sizes, and types. Embodying over 600 species in North America and approximately 1700 globally, the diversity of these perennial flowers is truly staggering.
The name ‘Aster’ is derived from the Greek word for ‘star’, a fitting description for their star-shaped flower head. They grow in a wide range of conditions, from cool, moist woodlands to dry prairies, showcasing their adaptability.
The blooming period of Asters stretches from late summer to fall, providing a vital source of nectar for pollinators, especially bees and butterflies. The vibrant colors of the flowers – ranging from white to pink to purple – add a splash of color to gardens, attracting these vital pollinators.
Asters are not just aesthetically pleasing – they also have medicinal properties. For instance, the smoke of burning Aster leaves was used by Native Americans to ward off evil spirits. Meanwhile, in Chinese traditional medicine, Asters are used to treat coughs, flu, and associated symptoms.
Cultivating Asters in your garden also requires some knowledge. They prefer full sun or light shade and well-drained soil. Regular watering and deadheading spent blooms will ensure a healthy growth cycle and an abundance of flowers. However, it’s essential to keep an eye out for common diseases like Aster wilt or pests like aphids and slugs.
Whether you appreciate them for their beauty, their hardiness, or their role in an ecosystem, Asters hold a special place in the world of botany.
Varieties of Asters: A Detailed Guide
Asters are a diverse group of flowers with numerous varieties, each with their own unique characteristics, history and charm. Below are a few notable examples.
New England Aster (Symphyotrichum novae-angliae)
Originating from North America, the New England Aster is renowned for its large, vibrant purple or pink blooms. Its flowers have a strong, sweet scent that attracts bees, butterflies, and other pollinators. It’s well-adapted to harsh winters and prefers moist, well-drained soil.
Smooth Aster (Symphyotrichum laeve)
Smooth Aster is distinguished by its smooth stems and leaves, and its bright, light purple flowers. Smaller than the New England Aster, it’s native to the central and eastern parts of North America. It’s known for its pleasant scent, which is softer and subtler than other Asters.
Heath Aster (Symphyotrichum ericoides)
The Heath Aster, also known as the ‘White Heath’, is a sprawling plant that features small white flowers, which bloom in profusion. It has a nearly identical structure to other Asters, but is unique due to its white color. Its scent is mild, and it’s widely cultivated for its value as a late-season pollinator plant.
Italian Aster (Aster amellus)
The Italian Aster is native to Europe and is one of the earliest known Asters. It’s recognized by its vibrant, violet-blue flowers. Unlike other Asters, its scent is slightly spicy, adding to its unique characteristics.
Tatarian Aster (Aster tataricus)
The Tatarian Aster is a large, dramatic variety that originates from Asia. Known for its late blooming season, it produces clusters of bright purple flowers. It’s scentless, setting it apart from other Asters.
Despite the differences in their appearances and scents, all Asters bear a striking resemblance to each other due to their unique flower shape. Their star-like flowers are not only a visual delight, but also play a pivotal role in attracting pollinators, contributing to the biodiversity of their respective habitats.
Asters Care Procedures

Asters are relatively easy to care for, but like any other plant, they need some attention and nurturing. Here are a few key tips to ensure your Asters thrive in your garden.
Light and Temperature
Asters flourish in full sun but can tolerate partial shade. Ideally, they should receive at least 6 hours of direct sunlight each day for optimal growth and flower production. Ensure your Asters are planted in a spot where they can bask in the morning sun; this will help in rapid evaporation of any dew or moisture on the leaves, decreasing the chances of fungal diseases.
When it comes to temperature, Asters are quite adaptable. They can withstand temperatures ranging from moderate to cold, making them excellent for cooler climates. However, they might struggle in extreme heat, especially if the condition persists for a prolonged period. It’s important to note that during the heat of summer, regular watering will help keep Asters healthy and prevent them from wilting. For indoor Asters, maintain a consistent room temperature, preferably between 60-70°F (15-21°C), to emulate the moderate outdoor conditions they typically grow in.
Water and Humidity
Asters’ water needs vary based on their environment and the specific variety. However, as a general rule, Asters prefer evenly moist soil, especially during the growing and blooming season. In the heat of the summer, regular watering is crucial to prevent wilting and to maintain the health of the plant. It may be necessary to water them once or twice a week, deeply, to encourage the roots to grow downwards, which makes the plants more resilient in dry conditions.
However, Asters are also susceptible to root rot, a condition that can manifest when the plant is waterlogged. To prevent this, ensure the soil is well-draining and avoid overwatering. The soil should feel moist, but it should not be overly soggy or waterlogged.
When it comes to humidity, Asters are quite tolerant and can thrive in different humidity levels. Nevertheless, high humidity, coupled with poor air circulation, can create an environment conducive for fungal diseases. Therefore, it’s important to ensure good air circulation around your Asters, especially if you’re growing them in a humid climate. If you’re growing Asters indoors, you may want to use a dehumidifier if your indoor environment is excessively humid. Regular misting is generally not required for Asters, but if the weather is exceptionally hot and dry, a light mist in the morning can help the plant cope.
Soil Type, pH, and Soil Preparation for Asters
Asters are quite adaptable when it comes to soil types. They can grow in clay, sandy, loamy, or even rocky soil. However, they thrive best in a well-draining, loamy soil rich in organic matter. In heavier soils like clay, Asters’ roots can struggle to penetrate and spread, which can inhibit their growth. If you have clay soil, consider amending it with compost or other organic matter to improve its texture and drainage. Sandy soils, on the other hand, may drain too quickly and not hold enough nutrients for the plants. In this case, adding organic matter can help to increase the soil’s nutrient content and its ability to retain moisture.
Regarding pH, Asters are fairly tolerant and can grow in slightly acidic to neutral pH levels (approximately between 5.8 and 6.5). However, they perform best in neutral soil. It’s always a good idea to test your soil’s pH before planting. If the pH is too high (alkaline), you can lower it by adding sulfur or composted leaves. If it’s too low (acidic), you can raise it by adding lime.
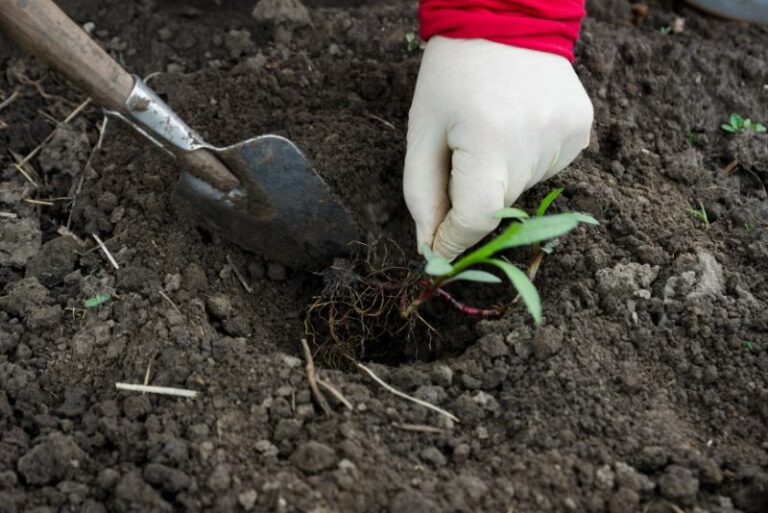
To prepare the soil for planting Asters, start by clearing the planting area of any weeds or debris. Dig a hole that’s wide and deep enough for the root ball of your Aster plant. If your soil is heavy clay or sand, amend it with compost or well-rotted manure to improve its structure and fertility. Place the Aster plant in the hole, ensuring that the top of the root ball is level with the soil surface. Backfill the hole with soil, firming it gently around the base of the plant. After planting, water thoroughly to settle the soil around the roots.
Fertilizer for Asters
Even though Asters are typically not heavy feeders, providing them with a balanced fertilizer can enhance their growth, health, and flower production. The type and frequency of fertilization depend on the quality of your soil.
- Type of Fertilizer: A slow-release, balanced fertilizer, such as a 10-10-10 or 14-14-14, is generally recommended for Asters. These numbers represent the ratio of nitrogen (N), phosphorus (P), and potassium (K) in the fertilizer, all of which are primary nutrients needed by plants. Nitrogen promotes foliage growth, phosphorus is excellent for flower production, and potassium boosts the overall health and hardiness of the plant.
- Fertilization Frequency: It is generally sufficient to feed Asters once at the beginning of the growing season, in the spring or early summer, when new growth begins to appear. However, in very poor soil, a second application midway through the summer can be beneficial.
- Application Procedure: When applying the fertilizer, spread it evenly around the base of the plant, avoiding direct contact with the plant’s stem. Follow the fertilizer package’s directions for the quantity. Too much fertilizer can do more harm than good, triggering excessive leafy growth at the expense of flowers, or even burning the plant.
- Composting: In addition to synthetic fertilizers, incorporating organic matter into the soil can act as a natural, slow-release fertilizer, providing a steady supply of nutrients to the plant. Before planting Asters, enrich the planting hole with plenty of compost or well-rotted manure. This not only adds nutrients but also improves the soil structure, aiding in moisture retention and root development.
Remember, regular soil tests can provide valuable information about your soil’s nutrient levels and help guide your fertilization practices. It’s always better to test before you invest in fertilizers, so you know exactly what your soil needs.
Care Procedures for Repotting Asters
Repotting Asters is a straightforward process but requires careful execution to avoid damaging the plant. The best time to do it is either in early spring or late fall, when the plant is in a dormant state. Here are the detailed steps:
- Choose the Right Pot: Select a pot that is one size larger than the current one. Make sure it has good drainage as Asters dislike waterlogged conditions.
- Prepare the Pot: Fill the new pot one-third full with well-drained, loamy soil enriched with compost or well-rotted manure. This provides a nutrient-rich base.
- Remove the Aster: Gently remove the Aster from its current pot. You can do this by turning the pot upside down while holding the stem between your fingers or gently tapping the sides to loosen it.
- Inspect and Prune the Roots: Check the root ball for any signs of disease or pests. Prune any roots that are damaged or excessively long.
- Plant the Aster: Place the plant in the new pot. The top of the root ball should be level with the soil surface. Backfill the pot with the compost-enriched soil, pressing gently around the base of the plant.
- Water the Plant: After repotting, water the Aster thoroughly. This will help settle the soil around the roots. For the first few weeks after repotting, keep the soil moisture level consistent to help the plant settle into its new environment.
- Place in the Right Conditions: Place the newly potted Aster in an area with the appropriate light and humidity conditions. Monitor the plant closely for a few weeks to ensure it adjusts to its new pot well.
Remember, while Asters are fairly resilient plants, they still require careful handling during the repotting process to ensure minimal root disturbance and stress.
Propagation of Asters
Asters can multiply in a variety of ways, such as division, stem cuttings, and seeds, each with its own set of procedures. Here, we provide a detailed guide on each of these propagation methods.
- Division: The easiest way to propagate Asters is through division. This is best done in early spring or late fall when the plant is dormant. To divide Asters, carefully dig up the entire plant and use a sharp, clean knife to cut the root ball into sections. Each section should have at least one shoot and a healthy system of roots. Replant each division as soon as possible and water thoroughly.
- Stem Cuttings: Propagating Asters from stem cuttings allows for more control over the size and shape of the new plants. Select a healthy, disease-free plant and make a cut 4-6 inches from the tip of a stem. Remove the leaves from the bottom half of the cutting and dip the cut end into a rooting hormone. Plant the cutting in a pot with well-draining soil, and keep it moist and in indirect light until new growth appears.
- Seeds: Growing Asters from seeds allows for a wide range of color and growth habit selections. Start by sowing the seeds in a tray filled with moist seed compost. Cover the seeds lightly with compost or vermiculite, maintain a temperature of around 70°F, and keep the compost moist. The seeds should germinate within two weeks. Once the seedlings are large enough to handle, they can be transplanted into individual pots or directly into the garden.
Regardless of the propagation method you choose, remember that patience and care are necessary to ensure the success of new Asters. Regular watering, appropriate light conditions, and a cautious eye for any disease or pest issues are all integral to the process.
Care Procedures for Pruning Asters
Pruning Asters is a crucial part of their maintenance routine, aiding in disease prevention and promoting vigorous flowering. Here is a step-by-step guide:
- When to Prune: The best time to prune Asters is in early spring, before new growth begins. However, lighter pruning can also be done in the late summer to control the size and shape of the plant, and encourage a dense, bushy growth habit.
- Tools Needed: Ensure you have a pair of sharp, clean pruning shears or scissors. Sterilize them before use to minimize the risk of transmitting diseases.
- Remove Dead or Diseased Wood: Begin by cutting off any dead, diseased, or damaged stems at the base of the plant. This helps maintain the plant’s overall health and vigor by reducing the risk of disease spread.
- Shape the Plant: Next, cut back the remaining stems to about half their original height. This helps create a compact, bushy plant which produces more flowers.
- Pinching Back: For taller Asters varieties, pinching back the tips of the stems in late spring or early summer can encourage branching and result in more blooms. Pinching back means removing the top one to two inches of the growing tips.
- Clean Up: After pruning, make sure to clean up all the pruning debris from around the base of the plant to prevent potential disease or pest problems.
- Aftercare: After pruning, water the plant thoroughly and apply a balanced fertilizer to support new growth.
Remember, while pruning can greatly benefit your Asters by keeping them tidy and healthy, excessive or improper pruning can harm the plant. Always observe the plant’s response to your pruning practices and adjust as needed.
Troubleshooting Asters
Caring for Asters, like any other plant, can present its own set of challenges. This troubleshooting guide will help you identify and address some of the most common issues faced when growing Asters, including growth problems, pests, and diseases.
Growing Problems
- Leggy Growth: Asters can become leggy and sparse if they do not receive adequate sunlight. Ensure your plant is situated in a location that receives at least 6-8 hours of full sun each day. You can also control leggy growth by pinching back the plant in early summer to encourage bushier growth.
- Poor Flowering: Asters may fail to produce many flowers if they are over-fertilized. While they do need some nutrients to thrive, too much nitrogen can lead to excessive leaf growth at the expense of blooms. It’s best to use a balanced fertilizer and follow the package instructions for application rates.
Pests
- Aphids: These small, soft-bodied insects can cause damage by sucking sap from the Asters. They can be controlled by introducing natural predators, such as ladybugs, or by applying an insecticidal soap.
- Slugs and Snails: These pests can chew holes in the leaves of Asters during the night. They can be controlled using organic slug pellets, barriers, or by hand-picking them during the evening.
Diseases
- Powdery Mildew: This is a common fungal disease that affects Asters, causing a white powdery growth on the leaves. It can be controlled by ensuring good air circulation around the plant and by applying a fungicide if necessary.
- Aster Yellows: This disease, caused by a phytoplasma, leads to stunted growth, yellow leaves, and deformed flowers. Unfortunately, there is no cure for this disease. Affected plants should be removed and destroyed to prevent the disease from spreading.
Remember that prevention is always better than cure. Regular inspection of your plants, appropriate watering, and the right growing conditions can keep most of these problems at bay. Your Asters will flourish when given the care they need.
Frequently Asked Questions about Asters
- Q: What kind of soil do Asters prefer?
A: Asters thrive best in well-draining soil. They can tolerate a variety of soil types, including clay, loam, and sandy soil, as long as it drains well.
- Q: How often should I water my Asters?
A: Asters should be watered regularly, especially during dry periods. They prefer evenly moist soil but can tolerate short periods of drought. Overwatering, however, can result in root rot.
- Q: Can Asters grow in shade?
A: While Asters can tolerate partial shade, they bloom best when planted in a location that receives at least 6-8 hours of full sun each day.
- Q: Why are my Asters not blooming?
A: Several factors can cause Asters to not bloom properly. They include insufficient sunlight, over-fertilization, and poor soil conditions. Adjusting these factors can help improve flowering.
- Q: What should I do if my Asters get a disease?
A: The first step is to identify the disease. Common diseases include powdery mildew and Aster yellows. Once identified, you can take appropriate action, which may include improving air circulation, applying a fungicide, or in the case of incurable diseases like Aster yellows, removing and destroying the affected plants to prevent spread.
- Q: How often should I prune my Asters?
A: Pruning should be done in early spring, before new growth begins. You can also do a lighter pruning in late summer to control the size and shape of the plant, and encourage denser growth.
Remember, the key to successful Aster gardening is providing the right growing conditions and regular care. Happy gardening!