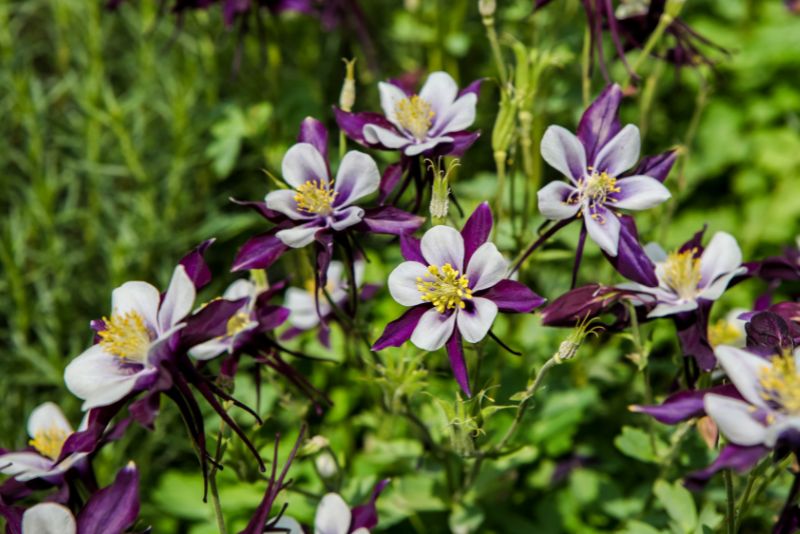
How to Grow Aquilegias: A Gardener’s Guide
Aquilegias, also known as columbines or granny’s bonnets, are a delightful addition to any garden, famed for their dainty, bell-shaped flowers and their ability to attract hummingbirds and butterflies. Cultivating these ornamental perennials can be the highlight of your gardening experience, providing an opportunity to foster a plant that not only beautifies your landscape but also thrives through careful attention and patience. Here’s a comprehensive guide on how to grow aquilegias from seeds or transplants and tend to them year-round, so you can witness the magic of these charming flowers in your own garden.
Choosing the Right Location for Your Aquilegias
Aquilegias are hardy plants that prefer a spot with well-draining soil and good sunlight. They can tolerate partial shade, making them versatile for gardens that don’t receive full sun. However, too much shade can lead to leggy growth and fewer blooms, so finding the right balance is key. Sandy or loamy soil is ideal, but they will happily grow in clay with proper amendments to improve drainage. When deciding on a location for aquilegias, consider a site with moist, fertile earth that isn’t too alkaline. A slightly acidic to neutral pH is best, and you can adjust the soil with compost or organic matter to hit that sweet spot before planting.
Planting Aquilegias: Seeds vs. Transplants
Deciding whether to start your aquilegias from seed or from a transplant largely depends on your preferences and the time of year. Sowing seeds is a more economical option and allows you to select specific varieties. Start seeds indoors in late winter, 8 to 10 weeks before the last frost, and transplant them in your garden in spring. Aquilegias are also easy to grow from transplants, which you can purchase at garden centers. Regardless of which method you choose, the planting process follows a similar pattern. When the soil is workable, dig a hole slightly larger than the root ball and place your seedling or transplant, then water it in gently.
Timing and Spacing
For seeds, timing is everything. You want to plant them at a time when they have a chance to establish themselves before temperatures become too hot or too cold. Space your plants about 1 to 2 feet apart to allow for adequate air circulation and future growth. This spacing should give them enough room to flourish while still creating a pleasing display of their unique foliage and flowers.
Caring for Your Aquilegias
Like any living thing, aquilegias need proper care to remain in top condition. These are relatively low-maintenance plants that do not require excessive fertilization or watering. They appreciate a good drink of water whenever the soil feels dry about an inch down. Be mindful not to overwater, as this can lead to root rot. Fertilize in the spring when new growth appears, and then again after the first bloom with a balanced, slow-release fertilizer.
The Pests and Diseases to Watch Out For
Aquilegias are generally resistant to diseases and pests, but they can fall victim to some common garden issues. Keep an eye out for leaf miners, a type of fly whose larvae create squiggly lines on leaves. If an infestation occurs, remove and destroy the affected leaves to prevent the spread. Powdery mildew may also appear, which is a fungal disease that looks like a white powder on the leaves. Ensure good air circulation, and if necessary, treat with a fungicide formulated for ornamental plants.
Propagation Techniques for Aquilegias
There may come a time when you want to share the beauty of your aquilegias with others or expand your garden. Fortunately, these perennials lend themselves well to propagation through seed collection and division.
Seed Collection
Aquilegias produce seed pods that appear after the flowers have finished blooming. Allow the pods to ripen and turn brown, then collect the seeds. To encourage new growth, it’s a good idea to deadhead spent blooms.
Division Methods
Mature plants can be divided in the early spring to rejuvenate them and to create new plants. Carefully lift the entire clump from the soil, then use a sharp knife or spade to separate the roots and crown into smaller sections. Each section should have a good amount of root and at least one “growth eye,” the place where new stems will emerge. Replant these divisions as you would a new transplant, ensuring they are in an area that meets their growing requirements.
Seasonal Care for Your Aquilegias
Different seasons bring different needs for your plants. Understanding what your aquilegias require as the year progresses is vital to their ongoing success and your enjoyment of their blooms.
Winter Preparation
In winter, aquilegias typically die back to the ground. Cut the dead foliage to the soil level, leaving the roots undisturbed. If your area experiences harsh winters, a light mulch can help protect the plant, but in most cases, aquilegias need little care during the colder months.
Spring Maintenance
After the last frost, you’ll begin to see new growth emerge from the soil. This is the time to remove any mulch you may have used to cover the plants. You can also start fertilizing and mulching again to keep the soil nutrients balanced and the moisture level consistent.
Conclusion and Final Thoughts on Growing Aquilegias
By following this comprehensive guide, you’re well on your way to successfully growing aquilegias in your garden. Remember to provide them with the right environment, care for them appropriately, and enjoy the beauty they bring. Whether you choose to grow them from seeds or use transplants, encouraging healthy growth through proper watering, feeding, and protection from pests and diseases will ensure your aquilegias will enchant you season after season.