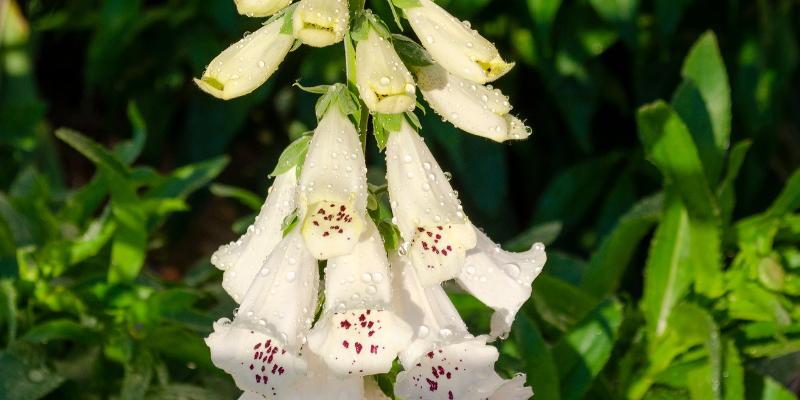
Growing Foxglove In Your Cottage Garden
Walking through the winding pathways of my quaint little cottage garden, I delighted in the riot of colors that greeted my eyes on this sunny summer afternoon. Delicate blue lupine swayed gently in the breeze, vibrant yellow calendula pops of sunshine among the greens. But it was the statuesque foxglove that truly captured my imagination, towering specimens reaching heights of well over six feet.
With their tapering fingers of bell-like blooms in dramatic hues of purple, pink, and white, they were truly a sight to behold. I found myself drawn time and time again to observe their intricate beauty, wondering how I might be able to coax such stunning flowers to flourish in my own small garden. And thus began my quest to grow foxglove, adding its unique charm and vibrancy to my little corner of the countryside.
In this post, I will share what I have learned about cultivating this beautiful biennial in the Cottage Garden.
Foxglove Overview
| Features | Description |
|---|---|
| Common Name(s) | Foxglove, Lady’s Glove, Dead Men’s Bells |
| Scientific Name | Digitalis purpurea |
| Family | Plantaginaceae |
| Height | 1.2-2.4 m or 3-6 feet |
| Light | Partial shade to full sun |
| Water | Regular watering but do not overwater, allow the top of the soil to dry out between watering |
| Soil | Well-draining, rich, acidic to neutral pH |
| Fertilizer | Apply a balanced liquid fertilizer monthly during growing season |
| Pests and Diseases | Aphids, slugs, snails, powdery mildew, leaf spots, crown rot |
Please note that all parts of the foxglove plant are poisonous if ingested, and can even be harmful through skin contact. Always use gloves when handling this plant.
All About Foxglove

Foxglove, with the scientific name Digitalis purpurea, holds an esteemed place in the realm of garden plants. Originating from Europe, this biennial plant is loved for its towering flower stalks, cloaked in a cascade of bell-shaped blooms during the summer season. Each flower, ranging in color from purple and pink to white, displays unique spots within, which act as landing guides for pollinating insects.
The plant exhibits a fascinating growth pattern. In its first year, foxglove primarily focuses on foliage growth, forming a rosette of leaves close to the ground. It’s in the second year that the magic happens as the plant sends up its distinctive tall flower spike, creating a visual spectacle in any garden setting.
Foxglove thrives in full sun to partial shade, making it a versatile plant for various garden situations. It prefers well-drained soil and although it’s quite a hardy plant, it appreciates some protection from intense midday sun and strong winds. Care should be taken while handling foxglove as all parts of the plant are toxic if ingested.
Propagation is usually by seed, either sown directly into the ground in spring or started indoors. It’s worth noting that foxglove readily self-seeds, often popping up in unexpected garden corners, adding to its charm.
In terms of pest and disease, foxglove is relatively trouble-free. However, it can sometimes be affected by fungal diseases such as powdery mildew, especially in humid conditions with poor air circulation. Regular observation and early intervention can keep these issues in check.
Despite its toxicity, foxglove has historical medicinal use. Digitalis, a powerful drug used to treat heart conditions, is derived from this plant. But caution must always be exercised due to its potential toxicity.
Foxglove, with its impressive height and vibrant blooms, is a rewarding addition to any cottage garden. It’s not only visually pleasing but also plays a crucial role in attracting and supporting pollinators. Whether planted as a solitary statement piece or woven into a border display, foxglove brings a touch of woodland magic to the garden.
Exploring the Varieties of Foxglove
Foxglove is known for its diversity, with over 20 species in the Digitalis genus, each with its unique characteristics. Here’s an insight into some of the most popular varieties and their distinct traits:
- Digitalis purpurea: The most common and well-loved variety, it boasts tall spikes densely populated with bell-shaped flowers that come in shades of purple, pink, and white. Originating in Europe, it’s notable for its distinctive inner markings, serving as guides for pollinators.
- Digitalis lutea (Straw Foxglove): A native to southern Europe, this variety displays delicate, small, yellow flowers. Despite its subtle color, it’s a resilient plant that can even thrive in dry, shady conditions.
- Digitalis ferruginea (Rusty Foxglove): This species is distinct for its rusty brown, elongated flowers, hence the name. It’s native to Eastern Europe and Turkey and is particularly loved for its ability to attract hummingbirds.
- Digitalis parviflora (Small-flowered Foxglove): Originating from Spain, it’s known for its intriguing chocolate-colored blooms. This sun-loving variety is perfect for adding an unusual touch to your garden.
- Digitalis grandiflora (Large Yellow Foxglove): Native to Europe and Asia, this variety features larger, bold yellow flowers and is especially hardy, handling colder climates better than its counterparts.
- Digitalis mertonensis (Strawberry Foxglove): A hybrid between D. purpurea and D. grandiflora, it’s one of the few perennial foxgloves. With flower color resembling the flesh of strawberries, it’s a favorite among gardeners.
Each of these Foxglove varieties brings a unique charm to the garden landscape, with their towering stems, vibrant colors, and captivating bell-shaped flowers. While Foxgloves are not particularly known for their scent, the visual spectacle they offer more than compensates for this. Despite their differences in looks and origin, all foxgloves share a similar growth pattern and requirements for successful growth. They all propagate by seed, flourish in well-drained soil, and appreciate protection from harsh midday sun. Remember, all varieties are toxic if ingested, and handling them warrants caution. Each variety offers its own touch of woodland magic, making Foxgloves a fascinating addition to any garden.
Foxglove Care Procedures
Being relatively low maintenance, foxglove doesn’t require much effort to grow successfully. However, they do have specific care requirements that will help ensure their health and longevity in your garden. Here are some essential care procedures for growing foxgloves:
Light and Temperature
Foxglove plants are quite versatile and can tolerate a range of light conditions. Still, the ideal situation would be a site with partial shade where the plant can receive filtered sunlight throughout the day. If positioned in full sun, the plant may need additional watering to prevent it from wilting. On the other hand, if the plant is in deep shade, it may become leggy as it stretches towards the light source.
When it comes to temperature, foxgloves can handle a variety of climates, but they particularly thrive in cooler conditions. They are hardy and can withstand temperatures as low as -30 degrees Fahrenheit, as outlined by their USDA hardiness zones of 4 to 8. However, during a particularly hot and dry summer, the plants may struggle and require extra care to survive. This could involve more frequent watering and possibly shading from intense midday heat.
Remember, foxgloves are biennials, meaning they will not bloom in their first year of life. So it’s essential to keep this fact in mind when planning your garden and consider using some interim plants to create a continuous display of color. Above all, observe your foxgloves and react to their needs – if they seem to be struggling in full sun, provide some shade, or if they’re wilting in extreme heat, provide extra water. By understanding and responding to their light and temperature needs, you can ensure your foxgloves flourish and bring beauty to your garden for years to come.
Water and Humidity
Understanding the water and humidity requirements of foxgloves is critical to their successful growth and development. These plants prefer moist, well-draining soil, but they can be susceptible to root rot if left in standing water.
Water: Regular watering is essential, especially during dry periods. The aim is to keep the soil consistently moist but not waterlogged. During warmer months, foxgloves may need watering as often as once or twice a week. However, be mindful to water the soil and not the leaves, as wet foliage can lead to fungal diseases. It’s best to water foxgloves early in the morning, giving the plants plenty of time to absorb the moisture before the heat of the day. In cooler, rainy periods, you can reduce watering frequency. Always check the top inch of the soil before watering; if it feels dry, it’s time to water again.
Humidity: Foxgloves can tolerate a range of humidity levels, but they do best in moderate to high humidity conditions. They thrive in cool, damp environments, similar to their native woodland and meadow habitats. However, they can struggle with diseases like powdery mildew in high humidity and poor air circulation. To prevent this, ensure your foxgloves have plenty of space around them for airflow, especially if you live in a particularly humid region.
Remember, the key to foxglove watering and humidity management lies in balance. Pay attention to the weather and adjust your care routine accordingly. Monitoring the plant’s health and growth will help you catch any signs of over or under watering and humidity stress early, allowing for prompt intervention.
Soil Types and pH
The soil in which you choose to plant your foxgloves can have a significant impact on their overall growth and health. Foxgloves prefer rich, well-draining soil, and they can tolerate a range of soil types. Here’s a closer look at how these plants perform in different types of soil:
Loam: This is the ideal soil type for foxgloves. Loamy soil is a well-balanced mix of sand, silt, and clay that typically contains an abundance of organic matter. It provides excellent drainage while retaining enough moisture for the plants to access.
Sandy: Foxgloves can grow well in sandy soils as long as they are well watered and fed. Sandy soil drains quickly, which can be a challenge during dry periods.
Clay: While foxgloves can tolerate clay soils, these can often be too heavy and poorly drained. If clay soil is all that’s available, consider amending it with organic matter to improve its structure and drainage.
When it comes to pH, foxgloves prefer slightly acidic to neutral soil (pH 6.0 – 7.0). However, they are quite adaptable and can tolerate slightly alkaline conditions as well.
Preparing the Soil
While foxgloves are not particularly demanding, taking the time to properly prepare the soil can help ensure their success. Here are some steps to get your soil ready for planting foxgloves:
- Test the Soil: Before you start, it’s a good idea to test your soil’s pH level. Soil testing kits are readily available at garden stores and online.
- Amend the Soil: If your soil is too acidic or alkaline, you may need to amend it. For acidic soil, you can add lime to raise the pH level. For alkaline soil, add sulfur or organic compost to lower the pH. If the soil is heavy clay, mix in organic matter or compost to improve drainage.
- Prepare the Planting Site: Dig the planting hole twice as wide as the root ball of your foxglove plant and just as deep. If you’re planting multiple foxgloves, space them about 12-18 inches apart to provide good air circulation and room for growth.
- Planting: Place the plant in the hole, making sure the top of the root ball is level with the soil surface. Backfill with soil, press down firmly, and water thoroughly.
Dedicating time to prepare the soil can make a significant difference in your foxgloves’ health and vitality. Remember that ongoing soil care, such as regular fertilization and composting, is also essential for the longevity and flourishing of your foxgloves.
Fertilizer Care for Foxgloves
Providing the right nutrients through fertilizing can greatly enhance the health and bloom of your foxgloves. Here’s a step-by-step guide to properly fertilize your foxgloves:
- Choose the Right Fertilizer: The best type of fertilizer for foxgloves is a balanced one, which contains equal parts Nitrogen (N), Phosphorous (P), and Potassium (K). Look for a blend labeled as 10-10-10 or 14-14-14, for example. Alternatively, you can opt for organic compost or well-rotted manure, which will gradually enrich the soil with nutrients.
- Initial Feeding: If you are planting new foxgloves, feed them with fertilizer just after planting. This will provide the plants with a nutrient boost that will help them establish in their new location.
- Regular Feeding: For established foxgloves, regular feeding should occur in the early spring, just as the new growth is beginning. This will help to promote healthy foliage and a profusion of flowers. You can also feed them again in mid-summer to support continuous bloom.
- Application Procedure: When applying the fertilizer, spread it evenly around the base of the plant, keeping it a few inches away from the stem to prevent burning. Then, lightly mix the fertilizer into the top layer of soil using a hand rake or your fingers.
- Watering After Fertilizing: Water the plant thoroughly after applying the fertilizer. This will help to carry the nutrients into the root zone where they can be absorbed by the plant.
Always remember to follow the manufacturer’s instructions when applying fertilizer to avoid overfeeding, which could potentially harm the plant. With proper feeding, foxgloves will reward you with abundant, vibrant blooms.
Repotting Foxgloves: A Detailed Guide
Repotting your foxgloves can stimulate healthier growth and ensure the longevity of your plants. Here’s a step-by-step guide to help you through the process:
- Choose the Right Pot: Select a pot that is one size larger than the current one. Ensure it has ample drainage holes to prevent water logging.
- Prepare the New Pot: Cover the drainage holes with a piece of broken pottery or a coffee filter to prevent soil from escaping. Fill the bottom of the pot with a layer of fresh, well-draining potting mix.
- Remove the Foxglove: Water your foxglove thoroughly a few hours before repotting to minimize root shock. Gently remove the plant from its current pot by turning it sideways, holding it gently by the stems, and tapping the bottom of its current container.
- Inspect the Root Ball: Check the roots for any signs of disease or pests. Trim off any damaged or excessively long roots.
- Place the Plant: Carefully place the foxglove into the new pot. The top of the root ball should be just below the rim of the pot.
- Backfill the Pot: Add more potting mix around the roots. Firm the soil gently around the plant with your fingers, ensuring that it is securely in place but not compacted.
- Water the Plant: Water the foxglove thoroughly after repotting. This will help settle the soil around the roots.
- Follow-Up Care: Place the repotted plant in a sheltered location out of direct sunlight for a few days to recover. Continue to care for it as usual but monitor closely for the first few weeks to ensure it adjusts well to its new pot.
Remember, the best time to repot foxgloves is in the early spring before they start their active growth phase. With a little care and attention during the repotting process, your foxgloves will continue to thrive and bloom year after year.
Propagation of Foxgloves: A Comprehensive Guide
Propagation of foxgloves can be achieved through various methods like division, cuttings, or from seeds. Each method has its own set of steps and considerations. Let’s delve deeper into each one:
Propagation by Division
One of the easiest ways to propagate foxgloves is by division. This method is best carried out in the early spring before active growth begins or in autumn after blooming has finished.
- Prepare the Plant: Water the foxglove plant well a day before the division process. This ensures the plant is well hydrated, reducing the shock of division.
- Dig Up the Plant: Using a spade, carefully dig around the plant, lifting it from the ground with as much of the root ball intact as possible.
- Divide the Plant: Using a clean, sharp knife, divide the plant into sections. Each section should have at least one healthy shoot and a portion of the root system.
- Plant the Divisions: Plant each division in a prepared hole, ensuring the top of the root ball is level with the soil surface. Water thoroughly after planting.
Propagation from Cuttings
Propagation from cuttings is another effective way to multiply your foxgloves:
- Take the Cutting: In spring or early summer, choose a healthy, vigorous stem and cut off a 4-6 inch long piece just below a leaf node.
- Prepare the Cutting: Remove the leaves from the lower half of the cutting. Dip the cut end in rooting hormone to encourage root development.
- Plant the Cutting: Place the cutting in a pot filled with moist, well-draining potting mix. Cover the pot with a clear plastic bag to create a mini greenhouse and place it in indirect light.
- Care for the Cutting: Keep the potting mix moist but not wet. In about 4-6 weeks, the cutting should develop roots and can be transplanted into a larger pot or garden.
Propagation from Seeds
Foxgloves can also be propagated from seeds:
- Sow the Seeds: Foxglove seeds are tiny and should be sown on the surface of a seed-starting mix in late winter or early spring. Do not cover the seeds as they need light to germinate.
- Maintain Moisture and Light: Keep the seed-starting mix moist and place the tray in a well-lit area. Germination usually occurs within 14-21 days.
- Transplant Seedlings: Once the seedlings have developed their first true leaves, they can be transplanted into individual pots.
- Harden Off and Transplant: Gradually expose the young plants to outdoor conditions over a week before transplanting them into the garden.
Remember, foxgloves are biennial or short-lived perennials, so propagating new plants every year ensures a continuous display of their stunning blooms in your garden.
Foxglove Care: Pruning Procedures
Pruning your foxgloves is an essential part of their care routine, as it promotes healthy growth and enhances blooming. Below is a detailed guide on how to prune foxgloves:
- When to Prune: The optimal time to prune foxgloves is after flowering in late summer or early fall. This allows the plant to direct its energy towards root and foliage growth, preparing for the next blooming season.
- Prepare Your Tools: Use a pair of sharp, clean pruning shears or scissors for the task. Disinfect the blades with rubbing alcohol or a household cleaner to prevent the spread of diseases.
- Identify Dead or Diseased Stems: Check the plant for any dead, diseased, or damaged stems. These are the parts that need to be removed first.
- Prune the Stems: Cut the identified stems at their base, making the cut at a 45-degree angle to prevent water accumulation on the cut surface.
- Deadheading: Deadheading, or removing spent blooms, is another form of pruning that keeps foxgloves looking neat and encourages more blooms. Simply pinch off the faded flowers at their base.
- Dispose of the Removed Parts: Do not leave the pruned parts near the plant as they can attract pests or diseases. Dispose of them properly.
- After-Pruning Care: Water the plant after pruning and monitor it for a few days for any signs of stress or disease.
Remember, while pruning is beneficial for foxgloves, excessive or improper pruning can harm the plant. Always prune with care and in moderation.
Troubleshooting
Foxglove Troubleshooting: A Detailed Guide
Caring for foxgloves can sometimes pose challenges, as various growing problems, pests, and diseases may affect these beautiful plants. This comprehensive guide will help you identify and solve common foxglove issues.
Growing Problems
- Poor Flowering: If your foxgloves aren’t blooming well, it could be due to insufficient sunlight, overcrowding, or poor soil nutrients. Ensure they are planted in a location with partial to full sun, adequate spacing, and nutrient-rich soil.
- Wilting or Yellowing Leaves: This could be a sign of overwatering. Foxgloves prefer well-draining soil and can suffer from root rot if the soil is too soggy. Adjust your watering schedule as needed.
Pests
- Aphids: These tiny, soft-bodied insects can be a common problem. They suck the sap from the leaves, causing them to curl and yellow. Use insecticidal soap or introduce beneficial insects like ladybugs to control the aphids.
- Slugs and Snails: These pests are fond of the soft foliage of young foxgloves. They can be handpicked off the plants or controlled with slug baits or traps.
Diseases
- Powdery Mildew: This fungal disease appears as a white, powdery coating on leaves and stems. It thrives in humid conditions and can be controlled with fungicides or by improving air circulation around the plants.
- Crown Rot: This disease is caused by a fungus that attacks the plant’s crown, causing it to turn brown and collapse. To prevent this, ensure good drainage and avoid overwatering.
By following these tips and guidelines, you can successfully grow and propagate foxgloves in your garden. Remember to give them the care they need, and their beautiful blooms will reward you year after year. Happy gardening! Unfortunately, even with proper care and attention, sometimes foxgloves may fail to thrive or encounter unexpected issues. Here are some common troubleshooting tips for foxgloves:
- Stunted Growth: If your foxgloves are not growing as expected, it could be due to poor soil quality or inadequate nutrients. Test the soil pH and add organic matter or fertilizer as needed.
- No Blooms: Foxgloves need a certain number of hours of sunlight each day to bloom. If they are not getting enough light, they may not produce any blooms. Make sure they are planted in a location with adequate sunlight.
- Pests or Diseases: Keep an eye out for pests and diseases that can affect foxgloves, and take prompt action to prevent them from spreading.
- Yellowing Leaves: This could be a sign of nutrient deficiency or overwatering. Adjust your fertilizer and watering schedule accordingly.
If you encounter any other issues with your foxgloves, consult a gardening expert or do some research to identify the problem and find a solution. With proper care and attention, your foxgloves will thrive and bring beauty to your garden for years to come.
Frequently Asked Questions about Foxglove
- Q: Do foxgloves come back every year?
A: Yes, foxgloves are biennial or short-lived perennial plants. This means they either have a two-year lifecycle or live for a few years. However, they often self-seed, producing new plants that will bloom in subsequent years.
- Q: How much sun does a foxglove need?
A: Foxgloves flourish best in partial to full sun. They need several hours of sunlight a day to produce their beautiful blooms. However, in very hot climates, some afternoon shade can be beneficial.
- Q: How often should I water my foxglove plants?
A: Foxgloves require well-draining soil and do not like to be waterlogged. The watering frequency can vary depending on climate, soil type, and rainfall, but a general rule is to water them deeply once a week, or when the top inch of soil feels dry to touch.
- Q: How do I deal with pests on my foxglove plants?
A: If you notice pests like aphids or slugs on your foxgloves, you can use insecticidal soap for aphids and slug baits or traps for slugs. Encouraging beneficial insects like ladybugs into your garden can also help control aphids.
- Q: My foxglove leaves are turning yellow. What’s wrong?
A: Yellowing leaves on foxgloves can be a sign of overwatering or nutrient deficiency. Check the moisture level of your soil and adjust your watering schedule if needed, and consider a soil test to determine whether additional nutrients are required. If all else fails, consult with a gardening expert.